Step 1: Unboxing and Inspection
- Remove the machine from the box and place it on a stable, level surface.
- Before turning on the machine, inspect for damage that may have occurred during shipping. If you notice any damage, contact us immediately.
- Save all packaging as this is needed for returns and repairs.
Step 2: Water quality
- Before introducing water to your machine, it's essential to test it to ensure it's adequately soft, around 50 ppm (parts per million). Use the included water test strips from your home barista starter kit to verify the hardness of your water. To learn more about our recommendations for water quality, check out our blog post, The Importance of Water and Your Espresso Machine.
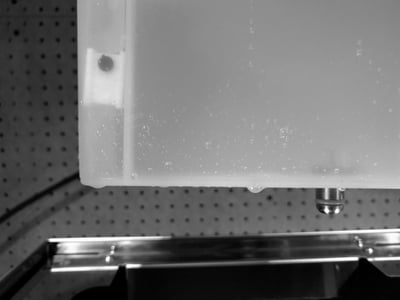
- Once you've confirmed your water quality is adequate, fill the water reservoir located underneath the top tray. Note: do not use Zero water or reverse osmosis as the machine will not register that the reservoir has been filled.
- You do not need to remove the water reservoir from the machine to fill however if you do, be sure to reseat the tank in the same orientation that it was removed. The magnet float engages a sensor inside the machine. The float must be seated as shown for the machine to function properly.
Step 3: Turning on your machine and filling your boilers
- Your machine is set for use on a 110v outlet. Prior to starting the machine, check if the steam and hot water valves are closed. Check to ensure the machine is switched off (power switch in lower position), and the drip tray is inserted accurately.
- Plug in your machine directly into a grounded socket (do not use an extension cord) and turn it on by using the ON/OFF switch on the lower left side of the front panel. Once on, the green LED will illuminate.
- Lift the brew lever to activate the pump. Water will begin filling the boiler (you will hear this). After a short period, you’ll start to see water coming through the group head. Once the boiler has been filled, there will be no more pump noise. Lower the brew lever once 8 ounces of water has been dispensed from the machine. The orange light will illuminate confirming this process is complete. Note: you may need to refill your water reservoir during or immediately after this process.
- Wait 15 to 20 minutes (or once the pressure gauge has reached 1.0-1.25 bar) for the machine to heat completely and the group head to come to temperature, then you'll be ready to pull your first shots!
Step 4: Pulling a Shot:
- Though your espresso machine has a PID, it is still a heat exchanger which means you may need to perform a cooling flush prior to pulling a shot. This allows water that sits idle in the machine and begins to overheat to be flushed out and not come in contact with the coffee. We recommend about a 5-second cooling flush before each shot.
- For help dialing in your equipment or pulling shots, check out the articles below or reach out to our team of coffee experts and technicians.