Please read carefully before using your ECM Casa V.
If you have any other questions, be sure to contact us.
Setup Video
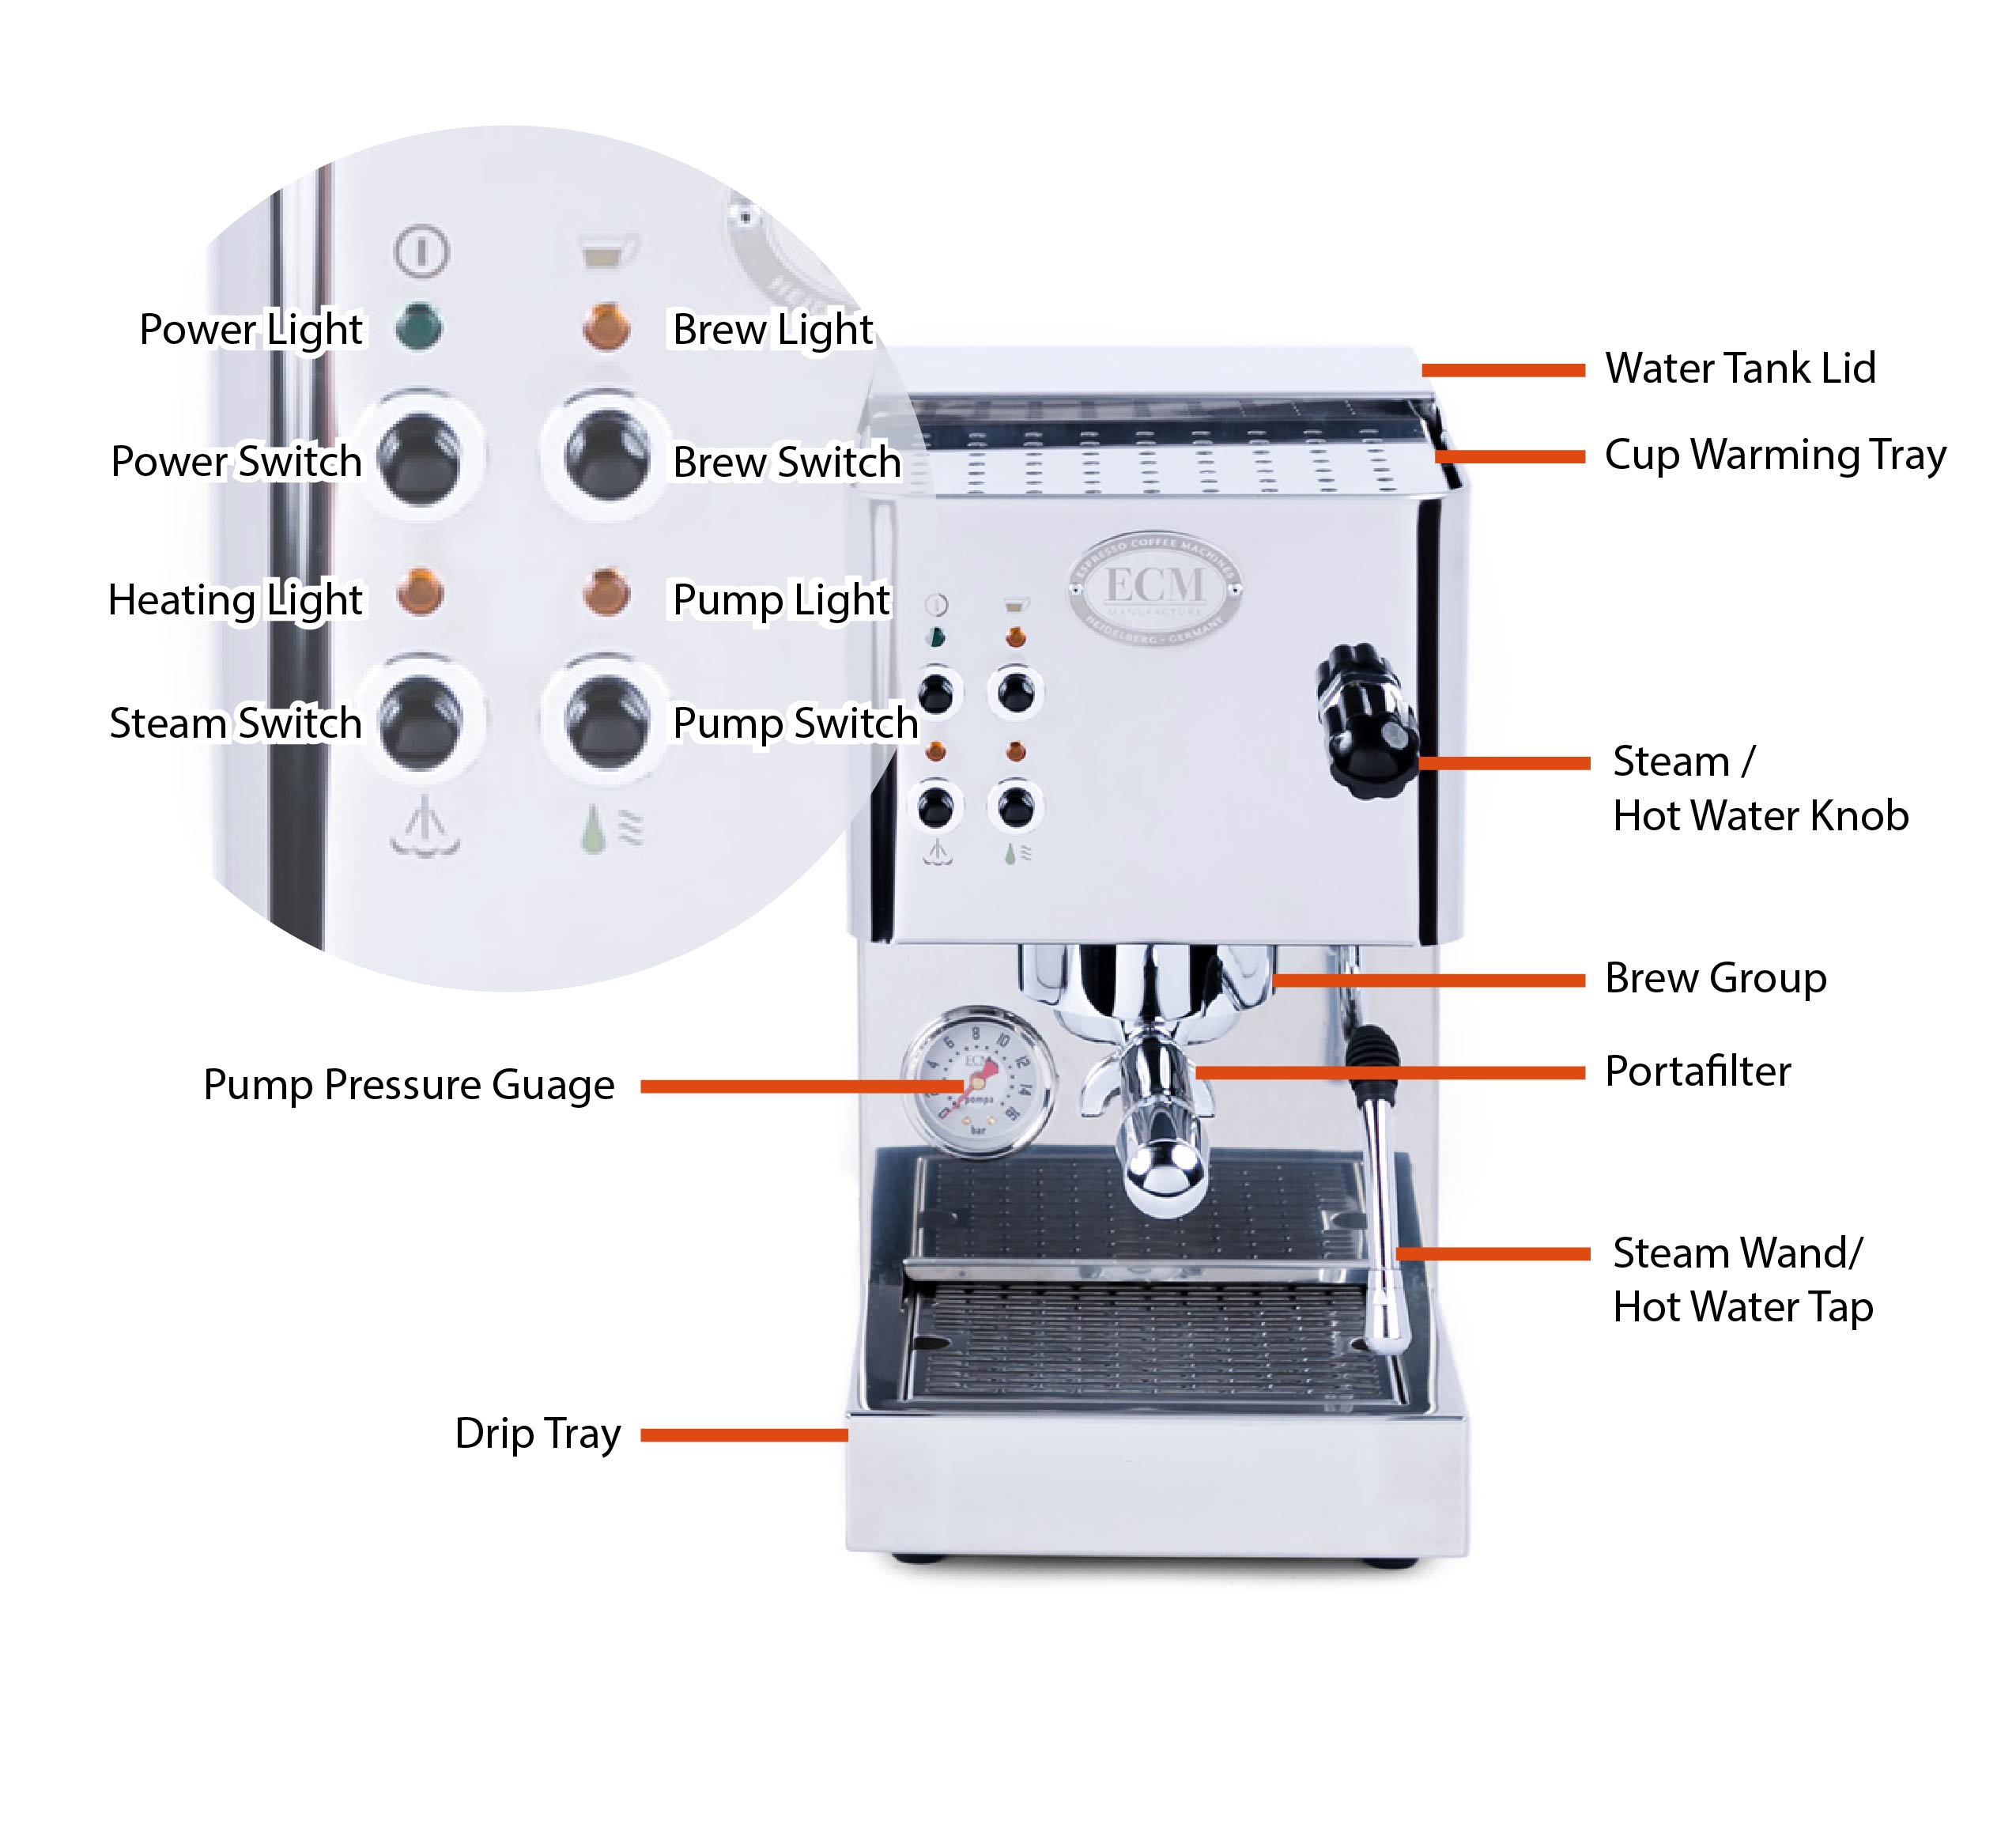
Machine Diagram
Included Accessories
- ECM Double Spouted Portafilter
- Double Basket
- Single Basket
- Plastic Tamper
- Backflush Blank
- Grouphead Brush
- Water Test Strips
Water
Espresso machines have specific requirements when it comes to water. There are two primary considerations: filtration and hardness.
Filtration gets rid of tiny particles, such as sand or rust, in your water. If these particles were allowed to enter your machine they could cause all manner of trouble, particularly by clogging the precise valves and mechanisms in your espresso machine. Almost any water filter will do the job, whether it’s the one built into your fridge, a Brita, or a whole house filter. Ensuring that this filter is replaced in proper time will be important to ensure machine health.
Water hardness is equally important. First, use the water hardness test strips included with your machine to test the water you plan to use with your machine. Ideally, we want a hardness of between 35-85 ppm (parts per million). Hardness refers to the dissolved solids in your water. Common dissolved solids are things like magnesium, calcium, and various forms of sodium. These dissolved solids are what make water, and therefore espresso, taste good. But too much will result in scale buildup in your machine. Scale can cause irreparable damage to your machine by clogging and forming a mineralized layer over the surface of metal parts. The process of descaling is even more damaging, eating away at the machines metal internals. Luckily, scale can be entirely avoided by keeping your water hardness within the recommended TDS range of 35-85 ppm.
There are numerous methods to soften your water should its dissolved solid content be too high.
A note on RO (Reverse Osmosis) or Distilled Water
Taste aside, espresso machines require some mineral content in order to function properly. Their steam boiler fill probes, in particular, use the conductivity of water to detect the water level. With no dissolved solids, they’ll overfill, giving you water instead of steam. You must add some mineral content back in. Our recommendation is Third Wave Water packets which are designed to offer ideal flavor and to be safe for your machine.
Reservoir Solutions
Our first recommendation is an in-reservoir water softening pouch. They’re affordable, last 4-6 months, and are very effective. Using RO water purchased by the gallon in combination with Third Wave Water packets is another great option.
No matter what solution you pick we recommend testing the water coming from your machine’s group head every few months. City water hardness changes seasonally and softening systems wear out. Routine testing will ensure you keep your machine safe.
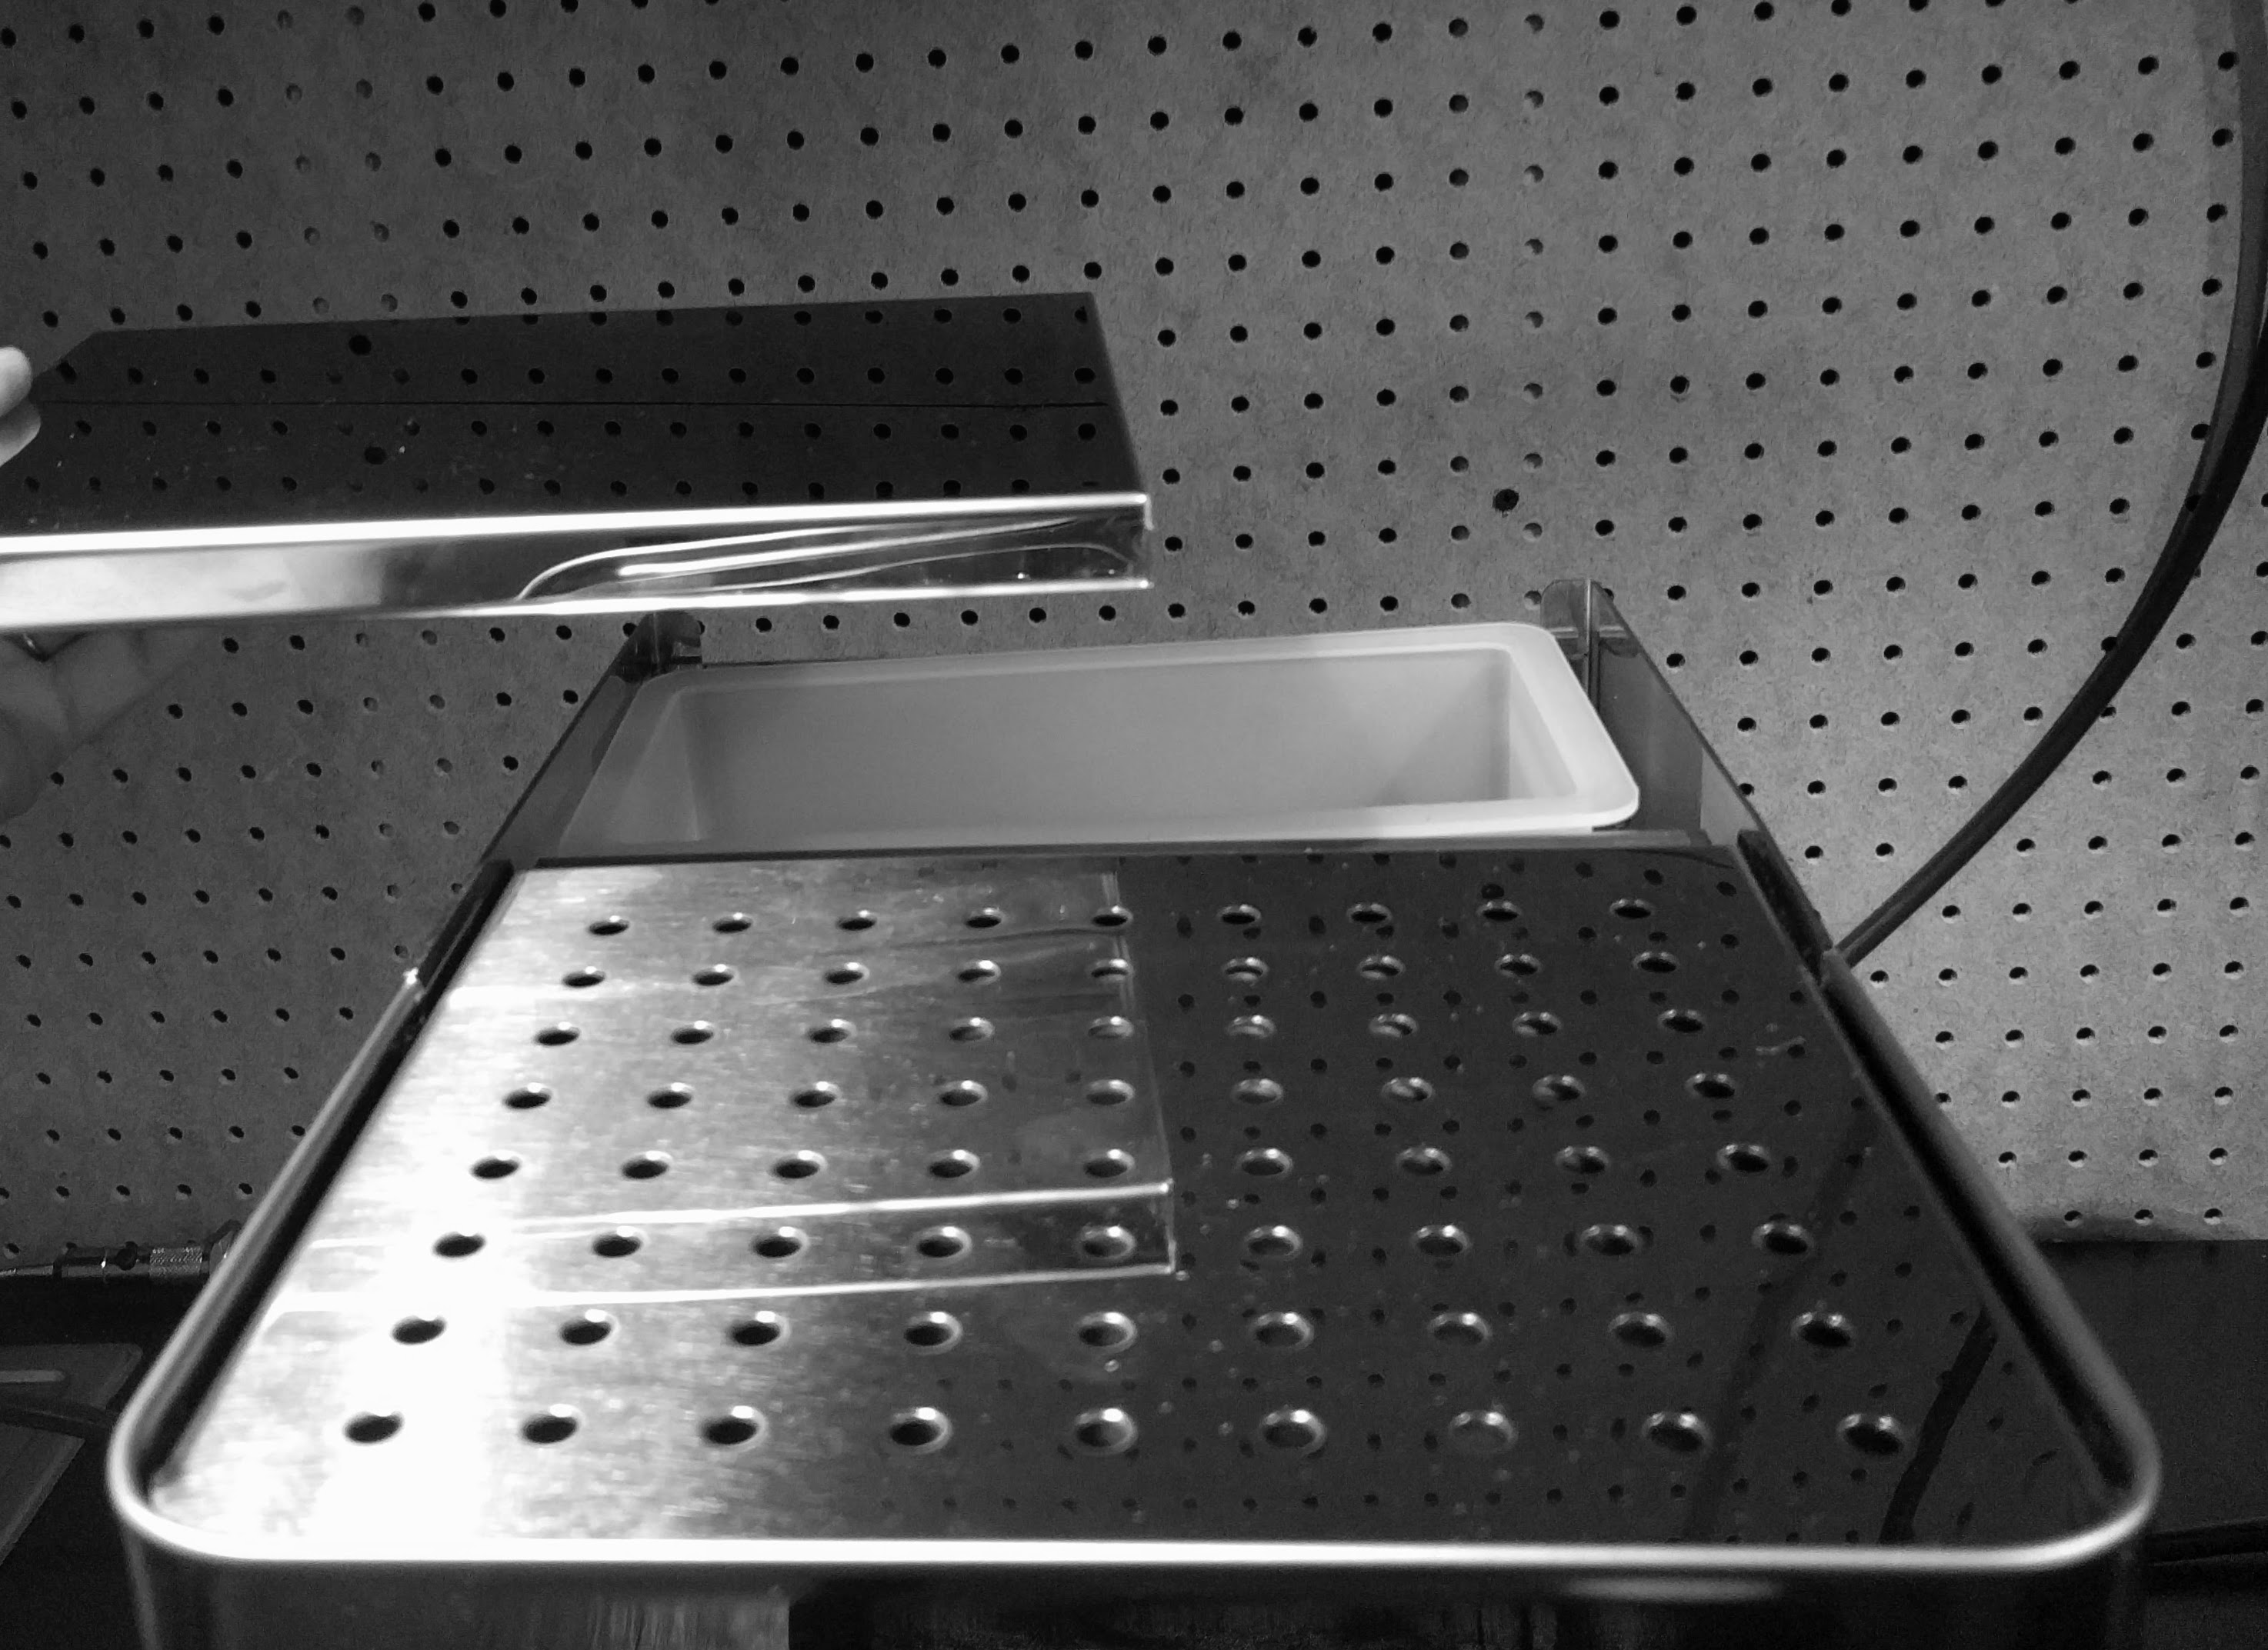
Filling the Reservoir
- The Casa V operates on a 3-liter water reservoir located under the rear tray.
- Use soft potable water only and do not operate the machine without water.
- Your 3 Liter reservoir will make approximately 25-30 drinks before needing to be refilled.
- To fill reservoir:
- Remove the rear tray and fill reservoir while seated in the machine
- Alternately you can remove the reservoir from the machine to fill.
- Fill reservoir to about an inch below the top of the tank.
- Reseat tank in the same orientation that it was removed.
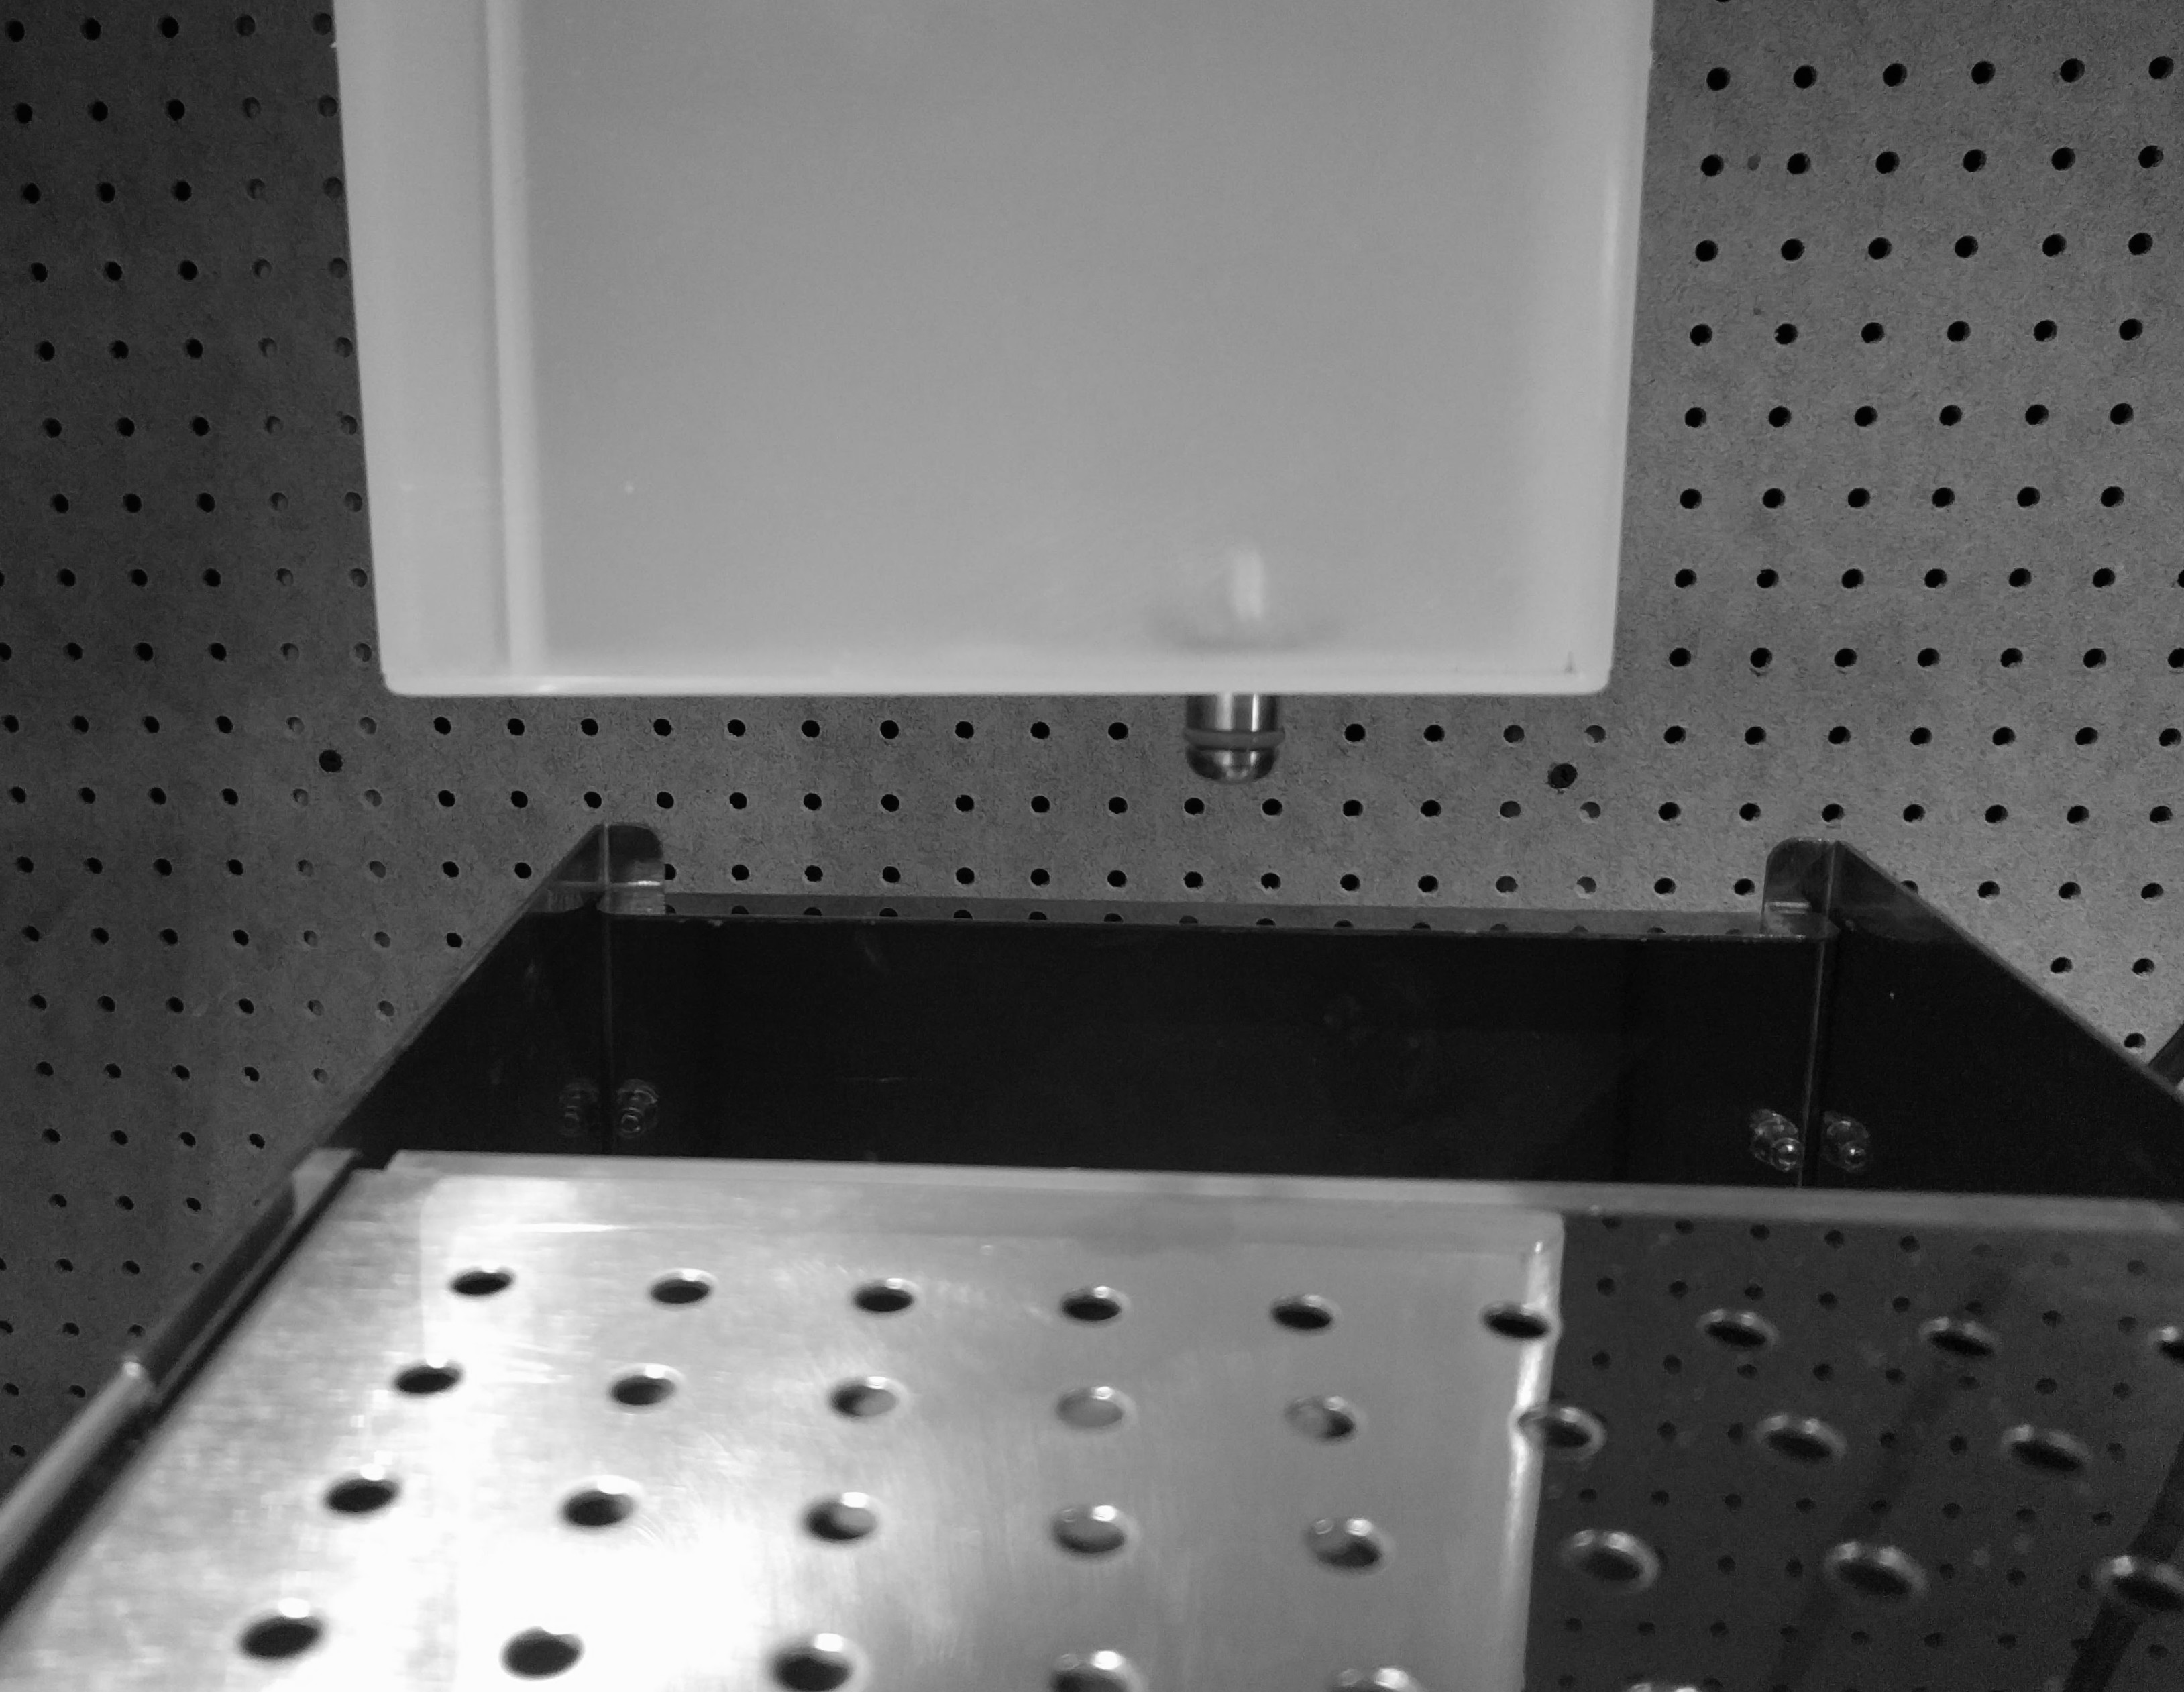
- This machine does not have a magnetic float or sensor.
- The Casa V is a reservoir only model.
Powering on your Machine
- Your machine is set for use on a 110v outlet.
- Prior to starting the machine, check all four buttons to ensure they are in the off/closed position (buttons clicked out), and the drip tray is inserted accurately.
- Plug the machine directly into a grounded socket, do not use an extension cord or multiple socket.
- The main power On/Off button is located just below the green power lamp. Clicked In is on and you will see the green led illuminate; Clicked Out is off, you will see the green led light and machine power off.
- **FIRST TIME STARTUP: BEGIN FILLING BOILER AS SOON AS MACHINE IS POWERED ON** Follow the first time startup instructions below to fill your boiler.
First Time Startup
- Following the steps above, fill your water reservoir, plug in the machine, and turn power on (Clicked In).
- **BEGIN FILLING BOILER AS SOON AS MACHINE IS POWERED ON** The heating elements begin heating once the machine is powered on.
- To fill your boiler at initial startup place the steam tip into an empty pitcher or directed into the drip tray, twist the black knob counter-clockwise to open the steam valve. At the same time engage the pump by pressing the coffee brew button (Clicked In).
- Let pump run until you see water coming out of both the group head and the steam wand.
- Twist the black knob clockwise to close the steam valve and turn off brew button (Click Out).
- A large amount of water is required for the first filling of the boiler, you can expect to refresh the water tank with water during this start up process.
- The machine is now ready to brew coffee.
Switching from Coffee to Steam
- When the machine is in coffee brewing mode (Main power on and all other buttons are closed/off), your boiler will heat to a preset temperature around 200F, the ideal coffee brewing temperature.
- To switch over to the steam setting you will be heating the boiler up to a preset temperature around 250F, you will also need to drain some water from the boiler to allow room for the steam to build up.
- Turn on steam mode button (Clicked In), place the steam tip into pitcher or drip tray, and open up the steam wand turning the knob counter-clockwise. You will see the orange indicator lamp illuminate.
- Keep the wand open and drain water from the boiler until you begin to see sputtering water and some steam building. Turn off the wand once the sputtering has nearly turned into steam.
- Wait for the orange light to turn off (once it has heated to about 250F it will stop heating), at this point, you are ready to steam your milk.
- After you have completed your milk steaming, wipe down your steam wand and turn off the steam boiler mode button (Click Out).
- Place the steam tip into an empty pitcher or drip tray and open up the steam wand turning the knob counter-clockwise to release steam, at the same time turn on the coffee brew button (Clicked In).
- Wait for water to refill the boiler and begin flowing from steam tip and group head. Once water is flowing at full capacity turn off the brew button (Clicked Out) and turn off the steam wand turning the knob clockwise.
- Wait for the orange light to turn off to indicate ideal brew temperature of 200F before pulling your next shot of espresso.
- If the machine will be idle for any period of time it best to leave it in coffee brewing mode or powered off.
Helpful Links
- Espresso 101
- More on Water and Setup
- Clive Blog
- Espresso Machine Cleaning & Maintenance
- Manufacturer Manual in PDF
Still have questions? Reach out to our coffee experts and technicians.