- Help Center
- Lelit Elizabeth
- Steam Boiler Maintenance
-
Getting Started
-
Espresso 101
-
Warranty, Ordering & Returns
-
Like New & Trade-In Program
-
General Troubleshooting
-
LUCCA Tempo
-
LUCCA A53 Mini/Mini Vivaldi
-
LUCCA M58 by Quick Mill
-
LUCCA X58 by Quick Mill
-
LUCCA A53 Direct Plumb
-
LUCCA Solo
-
LUCCA Accessories
-
LUCCA S58 by Profitec
-
La Marzocco Linea Mini
-
La Marzocco GS3
-
Lelit Mara X
-
Lelit Bianca
-
Lelit Elizabeth
-
Lelit Victoria
-
ECM Synchronika & Synchronika II
-
ECM Special Edition Classika PID
-
ECM Mechanika V Slim
-
ECM Mechanika VI Slim
-
ECM Casa V
-
ECM Puristika
-
Profitec MOVE
-
Profitec RIDE
-
Profitec JUMP
-
Profitec GO
-
Profitec Drive
-
Profitec Pro 300
-
Profitec Pro 400
-
Profitec Pro 500
-
Profitec Pro 600
-
Profitec Pro 700
-
Profitec Pro 800
-
Rocket Appartamento
-
Rocket R58 / Cinquantotto
-
Rocket Giotto
-
Rocket R Nine One
-
Rocket Boxer
-
La Spaziale S2 EK
-
Rancilio Silvia
-
Rancilio Silvia Pro
-
Rancilio Silvia Pro X
-
Sanremo YOU
-
Ascaso Steel DUO
-
Breville Barista Pro
-
Breville Oracle Touch
-
Flair Classic Espresso Maker
-
Flair 58 Pro 2
-
Flair 58 Plus Espresso Maker
-
LUCCA Grinders
-
WEBER WORKSHOPS Grinders
-
Baratza Grinders
-
Eureka Grinders
-
Eureka Mignon Zero
-
ECM Grinders
-
Fellow Grinders
-
Fellow Tally Precision Scale
-
Mahlkönig Grinders
-
DF64 Grinder
-
Quick Mill
-
Izzo Alex Duetto
-
Bezzera BZ10
-
Bezzera Duo DE
-
Bezzera Duo MN
-
Dalla Corte Mina
-
Compak Grinders
-
Dalla Corte Grinders
-
Profitec Grinders
-
Breville Grinders
-
Macap Grinders
-
Fiorenzato Grinders
-
Slayer
Lelit Elizabeth: Fill Probe Cleaning and Inspection
Use these instructions to inspect or clean your Elizabeth's steam boiler fill probe. You can also use these instructions to stop a steam leak at the fill probe's bottom fitting.
Tools Needed:
- 19mm deep socket with extension
-Scouring pad or wire bristle brush
- PTFE tape (al
1. Remove the top panel from the machine.
2. Identify the machine's fill probe.
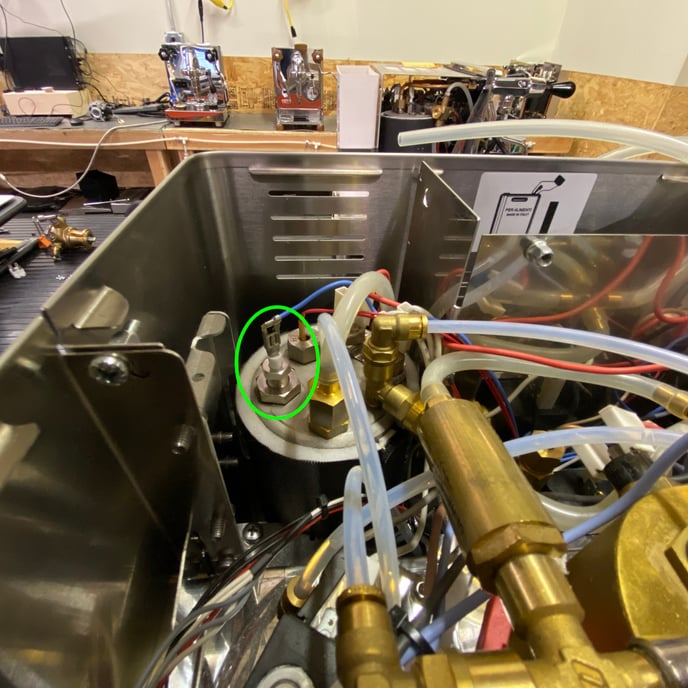
3. Remove the electrical connector from the fill probe.
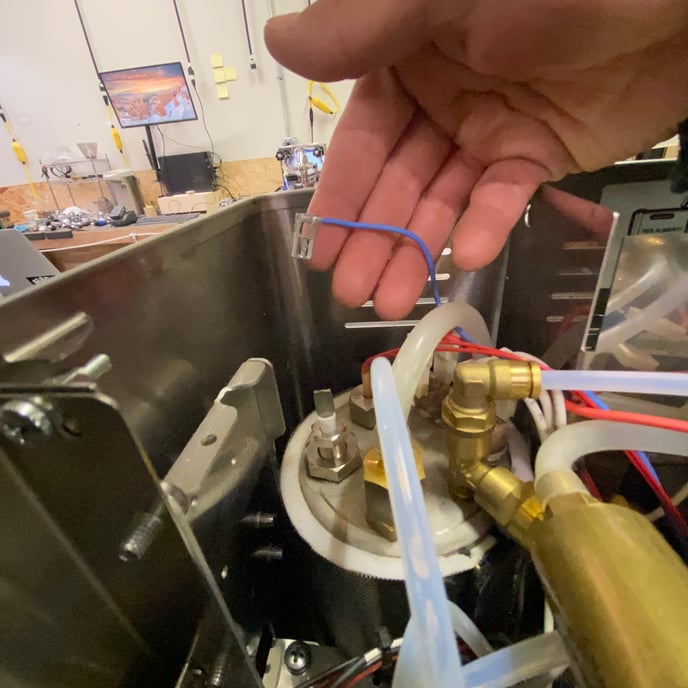
4. Use the deep socket and socket wrench to unscrew the fill probe.
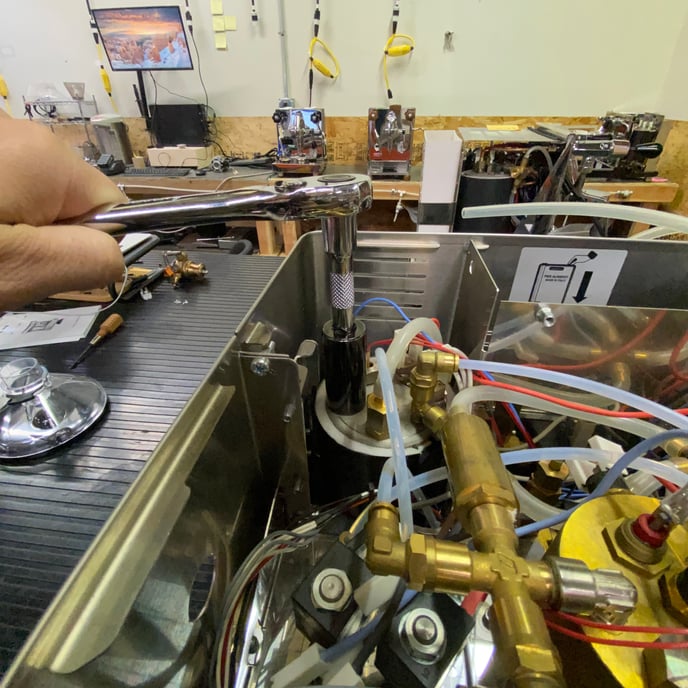
NOTE: If you don't have a deep socket, you can use a regular crescent wrench, but you will need to completely remove the wrap around side panel from the machine first.
5. Clean off any debris or build-up from the fill probe threads and from the top of the boiler.
6. Use a scouring pad or a wire bristle brush to clean any build-up from the fill probe. The probe should be clean and shiny before re-installing.
7. Use PTFE tape to wrap the fill probe threads. This will seal the connection with the boiler and stop any leaking.
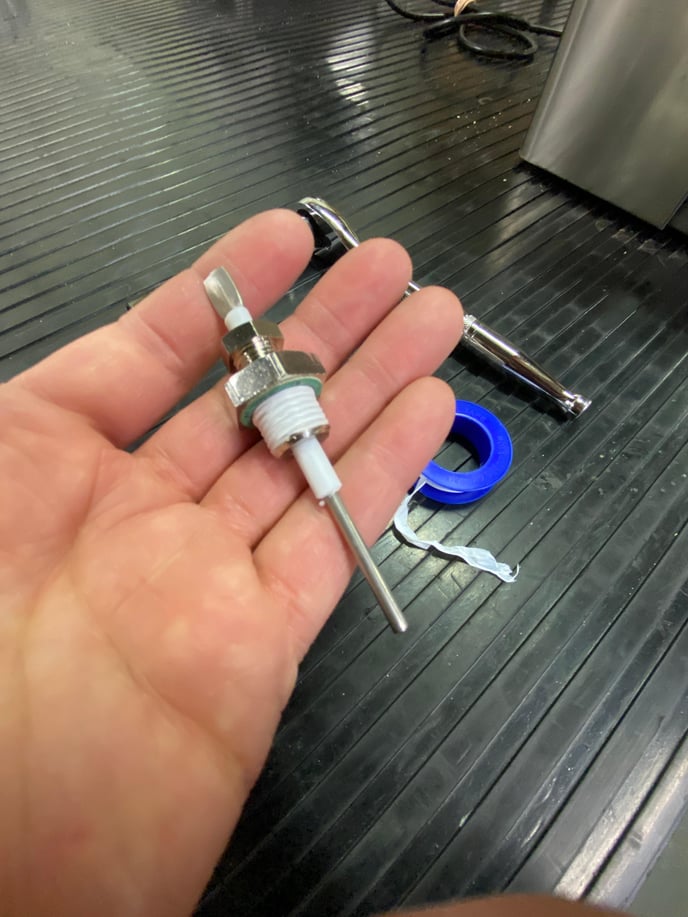
8. Re-install the fill probe in the machine. Purge the steam boiler and test for steam leaks before replacing the top panel.
NOTE: You will need to purge the steam boiler before it can be used. To accomplish this, follow these steps:
- Start with the machine off.
- Open the steam valve fully.
- Direct the steam wand into a large cup or pitcher.
- Plug the machine in and power it on.
- Allow the machine to fully heat both boilers.
- As the steam boiler comes up to temperature, it will purge all of the excess water from the boiler. Allow this process to continue as long as necessary.
- Eventually, the steam wand will dispense only steam, you can now close the steam valve and allow the machine to finish heating.
- Check for steam leaks.