Water Filter and Softener System Installation
Below is a video and step-by-step instructions on how to install a water softening and filtration system to your direct plumb espresso machine.
Clive Coffee: Water Softening & Filtration System
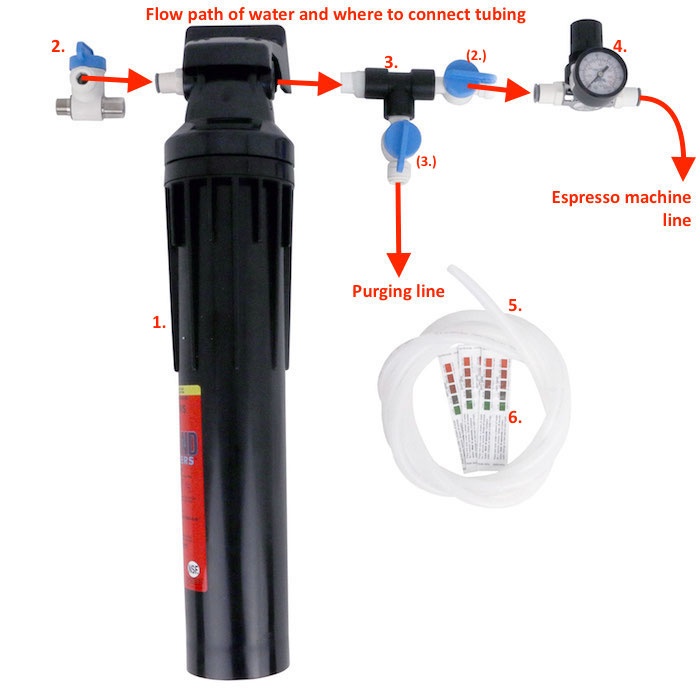
Kit contents:
-
- Cartridge
- Mounting Head
- Inlet 3/8 Push Connect Fitting
3. Outlet tee to machine and bleed valve
-
- Outlet from cartridge
- 3/8 Push Connect Fitting Stop Valve to machine
- 3/8 Push Connect Fitting Stop valve for Bleed Valve
4. Line pressure regulator
a. Adjustable Regulator w/ Gaugeb. 2x 3/8 Push Connect Fitting
5. (10 ft) ⅜” LLDPE tubing (additional tubing available separately)
6. Water hardness test strips
(Arrows for flow path from water source to espresso machine)

The photo above shows the parts included in the kit and the way water should flow from left to right. The flow should move from the Angle Stop Valve -> Softener Cartridge -> Outlet Tee -> Regulator -> Machine.
Water pressure should be 2-3 bar, or 30-45 psi. A water pressure regulator is included and should be installed between the filter assembly and the espresso machine. Read all instructions printed on the cartridge labels, as well as those included with the John Guest angle stop valve.
Notes on cutting and connecting tubing: Never use scissors, side cutters, or any method that will crush, flatten, or kink tubing. Use a sharp razor blade or specialty tubing cutter to produce a clean 90° cut. An angled cut, burrs, or kinking may result in leaks or damage to push connections. All long runs of tube should be cut so as to leave slack in the system. Any tension on the push connections from taut sections of tubing may result in leaks. This slack also makes it easier to perform maintenance on the system in the future. Make sure tubing is fully inserted into push connections.
When assembling kit: Verify all individual parts are securely seated to each other. When parts are assembled for shipping they are loosely attached and threaded connections will need to be tightened down.
Installation:
- Install Angle Stop Valve to cold water source. This is only necessary if you will be using an existing water line and need to T off of it to the espresso machine. If you have a dedicated water line you may not need to use this angle stop valve.
- Install inline shutoff valve into female threaded end of outlet tee.
- Install 3/8” adaptor into female threaded end of inline shutoff valve.
- Mount cartridge assembly using appropriate hardware for mounting surface.
- Cut and fit tubing to connect Angle Stop Valve to Softener Inlet. Cut and fit tubing to connect Inline Shutoff Valve to push connect fitting in the braided line to the espresso machine. Cut and fit tubing to bleed valve.
- If using a pressure regulator, it should be installed between the inline shutoff valve and braided line to machine.
- Important!! Make sure Inline Shutoff Valve "(2.)" and flush valve "(3.)" are both closed. Open the water supply at the Angle Stop Valve "2." and then open the flushing valve. The filter and softener system needs to be flushed before sending water to the espresso machine. We recommend flushing 3-5 gallons of water through the flushing valve. Once this has been done close the flushing valve and open the inline shutoff valve to send water to the espresso machine.
- Check for leaks. If any are found, close the angle stop valve. Try tightening any leaky threaded fittings. If the leak cannot be stopped by tightening the fitting, it may need to be removed and re-wrapped with thread sealing tape. Open the angle stop valve and check again for leaks.
Clive recommends you test your water regularly for appropriate hardness level. Replace cartridges after softening 1700 grains of hardness, or every 6 months.
NOTE: If you will be leaving the machine unattended for longer than 24-48 hours, it is highly recommended to shut off the water supply to the machine. This can be done with the stop valve included in the kit or at the source of the water supply going to the machine.