
Thank you for purchasing the La Marzocco GS3 dual-boiler espresso machine. Your new machine features a saturated group head, PID temperature control, shot timer, volumetric shot dosing, and a rotary pump that can be directly plumbed or run on its internal reservoir. This manual should contain everything you need to operate and maintain your machine. Please read carefully before using your machine. And if we've missed anything, you always know how to contact us. Let's get started!
* NOTE: ALWAYS KEEP YOUR ORIGINAL PACKAGING IN CASE OF RETURN FOR SERVICE
Manufacturer's's Manual in PDF
Remove the Machine from the Packaging
- Ensure the product’s integrity by inspecting the packaging, making sure it presents no signs of damage that might have affected the enclosed machine.
- Check the machine’s integrity after carefully removing the packaging. Packaging (boxes, plastic bags, foam parts, and whatever else) must not be left within easy reach of children due to the potential danger it represents, nor should it be discarded in the environment.
Safety Instructions
- Check to see that the data on the rating plate matches that of the main electrical supply to which the machine will be attached. This equipment must be installed to comply with applicable federal, state, or local plumbing codes.
- The installation must be performed according to local electrical and plumbing codes and regulations. The installation also must comply to the manufacturer’s instructions and must be performed by qualified and authorized personnel.
- Incorrect installation may cause injury or damage to people, animals, or objects, for which the manufacturer is not responsible.
- Safe electrical operation of this device will be achieved only when the connection to the power outlet has been completed correctly and in observance of all local, national, and international electrical codes and safety regulations, and particularly by grounding the unit. Make sure grounding has been done correctly, as it represents a fundamental safety requirement. Ensure qualified personnel check such a connection.
- Furthermore, you must ensure that the capacity of the available electrical system is suitable for the maximum power consumption indicated on the espresso machine.
- We do not recommend using adapters, multiple plugs, and/or extension cords. If you cannot avoid using them, make sure that they are exclusively of the kind that conforms to local, national, and international electrical codes and safety regulations, being careful not to exceed the power and current ratings indicated on such adapters and extension cords
Included Accessories
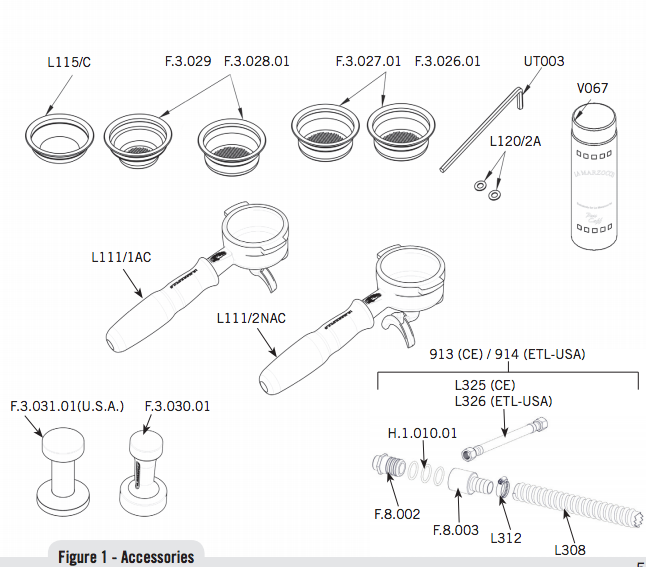
Tables cannot be imported directly. Please go to: https://clivecoffee.zendesk.com/hc/en-us/articles/115004433487-La-Marzocco-GS3-User-Manual and take an image of your table to use here.
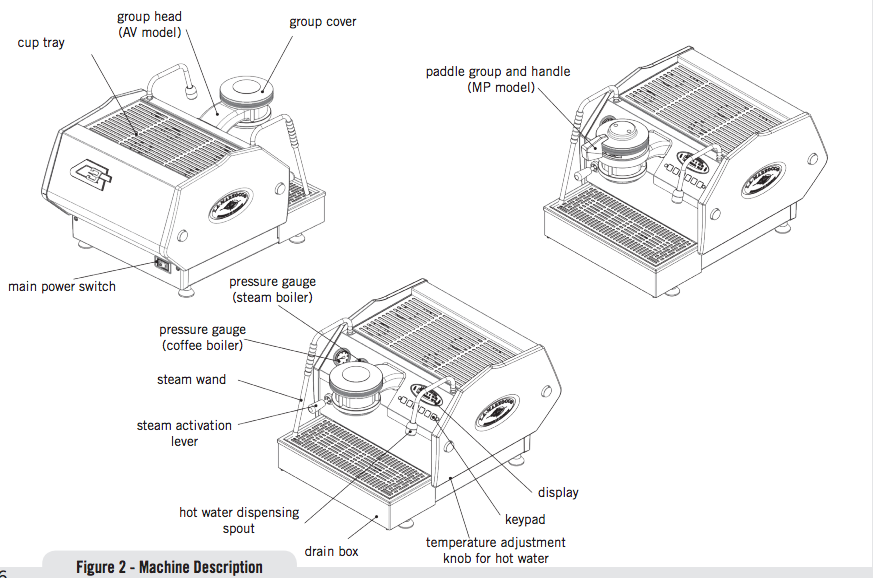
Machine Description
Espresso Machine Installation GS/3
1. Fill water reservoir with potable water
2. Connect Espresso Machine to Power Supply
3. Filling the Boilers with Water
- Engage the portafilter by inserting it into the group head and rotate the handle from left to right. Once the portafilter is inserted properly, you can press one of the brewing buttons on the keypad to start the flow of water through the portafilter. Brew water through the group for at least two minutes.
- Being careful to avoid burns, turn on steam wand for at least one minute.
- Turn on the hot water valve for the time necessary to allow at least 1 liter of water to be brewed.
a. Remove the left side cover assembly.
b. Locate the water pump adjustment screw and loosen the lock nut.
c. Adjust the water pump pressure to the desired measurement.
d. Rotate Clockwise to increase pressure and counter clockwise to reduce pressure.
NOTE: The water pump pressure should be adjusted when the machine is operating and coffee is present in the portafilter.

OPERATION
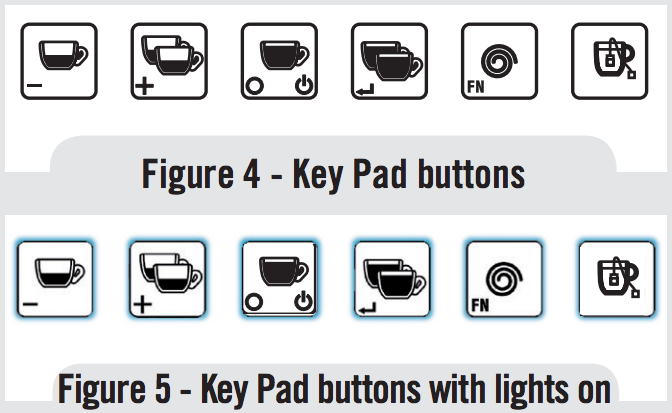
- Installing the Portafilters - Install the portafilter by inserting it into the group head and rotate the handle from left to right. Once the portafilter is inserted properly, you can press one of the brewing buttons on the keypad (AV model) or move the paddle handle from right to left (MP Model) to start the flow of water through the portafilter. Please refer to the Software Programming Manual for a description of the functions of the keypad. It is important that the portafilter is at operating temperature prior to filling with coffee. Allow hot water to pass through the empty portafilter for a few seconds before the brewing process to pre-heat the portafilter. Note: It is important to leave the portafilter installed in the espresso machine when not in use. The portafilter must remain heated for the brewing process to function correctly.
- Brewing Coffee - It is now possible to remove the portafilter to make a coffee beverage. Place some ground coffee in the portafilter basket using the single or double basket. Press down on the ground coffee with the supplied tamper and install the portafilter on the GS/3. On AV model press a brew button to begin the brewing process, or move the paddle handle from right to left to begin brewing on MP model (see Fig.2)
Note: Some users believe it is important to allow water to pass through the group head prior to installing the portafilter to flush any remaining coffee oils and particles from the group head. Some also flush just after brewing for the same reason. Please experiment to make the best possible procedure for your coffee. There are many techniques for brewing espresso. You can find instructions for many techniques on websites, blogs and forums. Some are even monitored by professional baristas around the world.
3. Dispensing Steam - In order to allow for any condensed water in the wand to be released ALWAYS allow some steam to be discharged by turning on the valve before inserting the steam wand into the pitcher of liquid to be heated. Dip the steam wand into the liquid to be heated. Depress the steam valve lever to activate the steaming process. The steam valve has a variable flow control. The steam valve will lock in the fully on position only. The steam will transfer heat to the liquid raising its temperature. Be careful not to allow liquid to overflow in order to avoid severe burns. Steaming milk for cappuccinos and other beverages is very easy but making it just right requires some skill. Please experiment with various techniques to find the best method for your milk. You can find many discussions about the steaming of milk on the internet.
NOTE: It is important to have a sufficient volume of liquid in the steaming pitcher. Therefore if you intend to steam small amounts of milk it is necessary to use a small pitcher. If you intend to steam larger quantities of milk then it is necessary to use a larger steaming pitcher. Using too little milk in a steaming pitcher can allow the milk to be “blown out” of the pitcher. A good rule to follow is to fill the steaming pitcher only half full of liquid.
NOTE: In order to prevent the heated liquid from being sucked back into the steam boiler it is recommended that you purge the steam system after heating any liquid. Purge the system by opening the steam valve for a few seconds to allow steam to escape to the atmosphere from the end of the steam wand. Failure to do so can cause the heated liquid to transfer from the steaming pitcher to the steam boiler (via vacuum created from cooling parts). This condition is undesireable and can cause contamination in the steam boiler.
4. Dispensing Hot Water - You may dispense hot water by using the hot water nozzle. To dispense hot water press the hot water button.
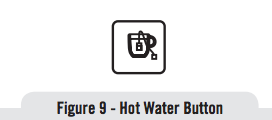
This button commands the hot water delivery. The volume of water delivered may be adjusted via the display (see the Software Programming Manual for further instructions). The temperature of the water dispensed may be adjusted by adjusting the mixing valve under the right side cover of the espresso machine (see machine description diagram, Figure 2, and the instructions on the next page).
***THE COFFEE BOILER AND STEAM BOILER CONTAIN WATER AT ELEVATED TEMPERATURE. WATER TEMPERATURE OVER 125°F/52°C CAN CAUSE SEVERE BURNS INSTANTLY OR DEATH FROM SCALDING (COFFEE BOILER 200°F/93.3°C-STEAM BOILER 260°F /127°C) **
***THIS MACHINE IS NOT SUITABLE FOR OUTDOOR USE. JETS OF WATER SHOULD NOT BE USED TO CLEAN THE MACHINE, NOR SHOULD IT BE PLACED WHERE WATER JETS ARE USED **
KEY FEATURES
- Controlling the Brew Process Using Volumetric Programming - This espresso machine allows the volumetric programming of each of the first 4 buttons on each group (numbered left to right). Please consult the Software Programming Manual for further instructions.
- Hot Water Dispensing - Hot water may be dispensed from the Hot Water Wand on the right side of the machine. This is accomplished by pressing the hot water button (Fig.9). The amount of water dispensed can be programmed via the digital display. Please consult Software Programming Manual for programming instructions. The temperature of the hot water may be adjusted slightly via the Hot Water Adjusting Knob. This adjusting knob is hidden under the right side panel assembly. The knob protrudes slightly form the bottom of the side panel. To find this knob, look at the bottom edge of the right side panel. The knob may be turned by sliding a finger under the side panel from front to rear (to decrease temperature) or from rear to front (to increase temperature).
- Quick Keys - The GS/3 has 4 Quick Keys to allow the user to gain quick and easy access to important parameters that may be changed frequently. Please see the Software Programming Manual.
- Water and Drain Connection Kit - The GS/3 comes with a main water supply and waste drain connection kit. This kit allows the GS/3 to be connected to the main water supply and the main waste drain system. Instructions for installing this kit are contained in the GS/3 Installation Manual. The conversion kit contains the following items:
- General Notes for Coffee Preparation - The portafilters must remain heated since they are at the lowest position of the group itself, and they are partially isolated from the same due to the rubber gasket between them. This can be accomplished by leaving the portafilters installed in the machine when not in use. The portafilters may also be actively heated by activating one of the brew buttons to flush hot water through the portafilter then turning off the water flow.
- Coffee Grind - The size of the coffee granules is extremely important in preparing a good cup of coffee, along with the type of coffee blend used. The ideal grind can be determined by making various coffees using the amount of ground coffee that you would normally use for each cup (we recommend at least 6g). The best grind is that which allows coffee to flow out from the portafilter spouts neither too slowly, drop by drop, nor too quickly. A general rule is that a double dose should dispense approximately 60mL / 2 fluid oz. of espresso in approximately 25 seconds. This time may be adjusted by varing the coarseness of the grind.
- IMPORTANT To improve the flavor profile of the espresso, the temperature of the water in the coffee boiler, and therefore of the groups, may eventually be raised or lowered via the digital display (please consult Software Programming Manual for detailed instructions).
N.B. If the machine has not been used for more than 8 hours or, in any case, after long periods of being idle, in order to use the machine to its full potential it is necessary to perform some cleaning cycles before brewing beverages as follows:
- Group: with the portafilter engaged in the group brew water through it for at least two minutes
- Being careful to avoid burns, turn on each steam wand for at least one minute.
- Turn on the hot water valve for the time necessary to allow 1 liter of water to be brewed.
- If using machine with water reservoir, change the water in the reservoir daily. If the machine is not going to be used for long periods of time, it is advisable to follow these safety indications:
- Disconnect the machine from the water mains or interrupt the water connection via a mains tap.
- Disconnect the machine from the electrical mains.
** If the above-mentioned instructions are not adhered to the manufacturer cannot be held responsible for damage to persons or things. **
PREVENTATIVE MAINTENANCE AND CLEANING
Cleaning (Daily)
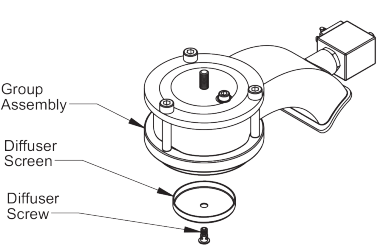
1. Cleaning the Diffuser Screen- During the discharge operation (subsequent to coffee brewing), small amounts of coffee grounds may slowly build-up on and obstruct, even partially, the diffuser screen. Turn off the machine and remove the diffuser screen by unscrewing the diffuser screw. Soak in detergent powder liquid following the instructions of detergent manufacturer. Rinse thoroughly with clean water. Install and run hot water through the group head several times with the screen installed.
2. Cleaning the Brewing System- Insert the blind filter into portafilter and put the correct amount of espresso cleaning product (following the product’s instructions) into the filter, engage the portafilter into the group you want to clean.
- Press the brewing button for said group, as if you were making a regular cup of coffee. Stop the water after about 15-20 seconds.
- Start and stop the group several times until you notice clear water being released instead of soapy water when you remove the portafilter. Do not remove the portafilter when group is actually brewing water. (DO NOT REMOVE THE FILTER HOLDER WHILE RELATIVE GROUP IS BREWING HOT LIQUIDS. THE COFFEE BOILER CONTAINS WATER AT ELEVATED TEMPERATURE. WATER TEMPERATURE OVER 125°F / 52°C CAN CAUSE SEVERE BURNS INSTANTLY OR DEATH FROM SCALDING.)
- Rinse the group using a normal filter in the portafilter, by running hot water through it several times.
3. Cleaning Filter Baskets and Portafilters- With daily cleaning of the stainless steel filters and portafilters it is sufficient to clean them with water and a cloth or appropriate brush. Otherwise, using an espresso cleaning product, following the product’s instructions put the correct dose in about 1/2 a litre of water inside a heat-resistant container and heat.
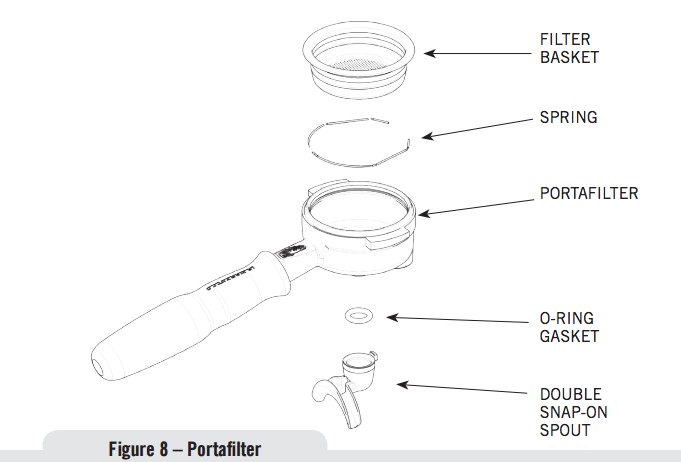
- If using stainless steel portafilters with snap-on spouts remove the spout. Immerge filters and metallic parts of portafilters (not handles) in the hot solution and leave them submerged for about 30 minutes.
- Rinse thoroughly with clean water and run hot water through the group several times with the filter and portafilter engaged.
4. Cleaning the Drain Box- Remove the drain box assembly and wash each of the components with hot soapy water. Rinse thoroughly and reinstall the drain box assembly. All components of the drain box assembly are dishwasher safe. 5. Cleaning the Body. Wipe the stainless steel surfaces with a soft, non abrasive cloth in the direction of the glazing marks, if any. Do not use any alcohol or solvents whatsoever on painted, imprinted, or plastic parts in order not to damage them. Clean the side panels using
5. Cleaning the Body - Wipe the stainless steel surfaces with a soft, non abrasive cloth in the direction of the glazing marks, if any. Do not use any alcohol or solvents whatsoever on painted, imprinted, or plastic parts in order not to damage them. Clean the side panels using a soft cloth. Do not spray the keypad or display with any liquid. Clean only with a damp soft cloth.
6. Cleaning the Hot Water and Steam Nozzles - Steam nozzles must be cleaned immediately after use with a damp cloth and by producing a short burst of steam so as to prevent the formation of deposits inside the nozzles themselves, which may alter the flavor of other drinks to be heated. Hot water nozzles must be cleaned periodically with a damp cloth. If milk residue is present on the steam wand, soak the tip in a container of hot water, then it will be possible to wipe the tip clean. Repeat process if residue remains. NOTE: This cleaning schedule is based upon a moderate to average use (20- 300) cups per day. If machine use is less than moderate then this schedule may be adjusted accordingly.
Cleaning (Periodic)
1. Draining Boilers. Both the coffee boiler and the steam boiler may be drained and refilled to reduce the chance of mineral deposits build up on the inside walls of the inside surfaces. Additionally, this draining process can be used to remove water that has a bad odor or taste.
Drain the Steam Boiler: Turn OFF the machine. Remove the left side panel assembly. Locate the ball valve on the bottom left side of the machine. Hold the ball valve with one tool and remove the brass cap on the end of the valve. Move the espresso machine close to a waste drain and tip machine at an angle to point the valve into the waste drain.
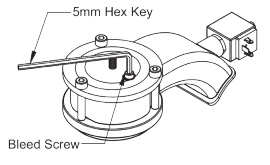
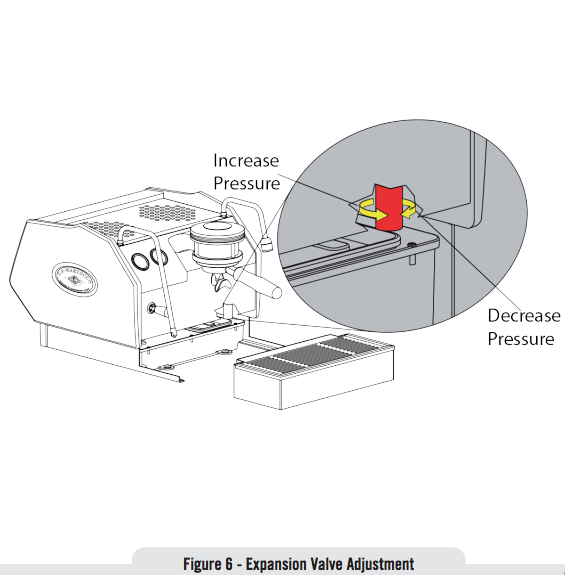
Drain the Coffee Boiler: Turn OFF the machine. Using adequate protection or an appropriate tool, loosen the expansion valve until water begins to flow freely. Then remove the group cap cover and loosen the bleed screw. When finished draining empty the drain box assembly.
2. Clean the Water Reservoir. The water reservoir needs to be cleaned periodically to ensure that no algae forms on the inside surfaces. To clean first remove the water reservoir form the machine. Disconnect the clear plastic water intake hose. Unscrew all screws from the cover to separate the parts. Wash all parts with warm soapy water. All parts are dishwasher safe.
Now you're ready to start pulling shots!
Helpful Links