Please read through the entirety of the setup guide before following along. If you have any questions, contact our team at Clive Coffee. Additional information can be found in the ECM Puristika User Manual.
Step 1: Inspect the box and the machine for damage
- Remove the machine from the box and place it on a stable, level surface.
- Before adding water and turning on the machine, inspect for damage that may have occurred during shipping. If you notice any damage, contact us immediately.
- Save all packaging in case of returns and repairs.
Step 2: Water quality and connecting to the water reservoir
- Before introducing water to your machine, it's essential to test it to ensure it's adequately soft, around 50 ppm (parts per million). Use the included water test strips from your home barista starter kit to verify the hardness of your water. To learn more about our recommendations for water quality, check out our blog post, The Importance of Water and Your Espresso Machine. Do not use distilled or Zero water in your espresso machine.
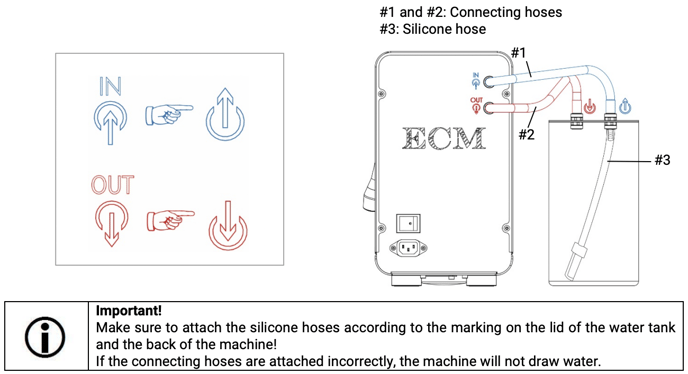
- Attach the connecting hoses to the back of the machine. Put the other end of the connecting hoses through the corresponding holes of the water tank lid. Attach the silicone hose on the inside of the water tank lid.
- At this time, fill the water tank with your filtered, softened water and place the lid with the silicone hoses on the water tank.
Step 3: Turning on your machine and filling your boilers
- Insert the power cable properly into the socket and turn the on/off switch on the back of the machine down to the “-” to turn the machine on. The orange light will illuminate indicating it's on.
- After a few seconds, a pump noise should occur which indicates the machine is filling the boilers. The PID will light up and display the temperature. Once it reached 93°C (which should take about 10 minutes), the machine is fully heated and ready to use.
- To accelerate the heating process and to ensure the group head is fully heated, lift the brew lever for about 10 seconds and allow water to run through the group.
Note: It’s normal for the indicator of the pump pressure gauge to move slightly during the heating-up phase.
Step 4: Programming the PID
- In the settings of the PID, you can adjust the temperature of the coffee boiler (t1), program cleaning reminders (CLN), eco mode (ECO) to automatically turn off your machine, and temperature more (o) to select between C for Celsius and F for Fahrenheit.
- To enter into programming mode, press the plus and minus buttons simultaneously until t1 appears.
- The minus button allows you to scroll through the settings menu. The plus button selects the setting you wish to edit. Wait a moment for the PID to read the setting you have edited and then press the minus button to exit programming mode.
- For details on how to program your machine, see the ECM Puristika User Manual.
Step 5: Adjusting the expansion valve
- Adjusting the expansion valve allows you to adjust the pressure of your machine, choosing a value between 8.5 and 12 bar.
- To adjust the brewing pressure, place the portafilter with the blind basket into the group head. Lift the brew lever to engage the pump then move the knob clockwise to raise the pressure and counter-clockwise to lower it. Once you reach your desired pressure, (indicated on the pressure gauge on the left side of the machine), lower the brew lever.
Step 6: Pulling a Shot:
- For help dialing in your equipment or pulling shots, check out the articles below or reach out to our team of coffee experts and technicians.