- Help Center
- LUCCA A53 (Direct Plumb & Mini) by La Spaziale
- General Maintenance
-
Getting Started
-
Espresso 101
-
Warranty, Ordering & Returns
-
Bezzera BZ10
-
Bezzera Duo DE
-
Bezzera Duo MN
-
LUCCA A53 (Direct Plumb & Mini) by La Spaziale
-
LUCCA M58 by Quick Mill
-
LUCCA S58 by Profitec
-
LUCCA X58 by Quick Mill
-
La Marzocco Linea Mini
-
La Marzocco GS3
-
Lelit Bianca
-
Lelit Elizabeth
-
Lelit Victoria
-
ECM Synchronika
-
ECM Special Edition Classika PID
-
ECM Mechanika V Slim
-
ECM Casa V
-
ECM Puristika
-
Profitec Pro 300
-
Profitec Pro 400
-
Profitec Pro 500
-
Profitec Pro 600
-
Profitec Pro 700
-
Profitec Pro 800
-
Rocket Appartamento
-
Rocket R58 / Cinquantotto
-
Rocket Giotto
-
Rocket R Nine One
-
La Spaziale S2 EK
-
Rancilio Silvia
-
Rancilio Silvia Pro
-
Rancilio Silvia Pro X
-
Izzo Alex Duetto
-
Quick Mill
-
Breville Oracle
-
Dalla Corte Mina
-
Slayer
-
Lucca Grinders
-
Baratza Grinders
-
LUCCA Atom 75
-
Eureka Grinders
-
ECM Grinders
-
Compak Grinders
-
Fellow ODE Grinder
-
Mahlkonig Grinders
-
Profitec Grinders
-
Breville Grinders
-
Dalla Corte Grinders
-
Macap Grinders
-
Fiorenzato Grinders
-
General Troubleshooting
-
Like New & Trade-In Program
-
Eureka Mignon Libra
-
Eureka Mignon Libra User Manual
-
Rocket Boxer Setup Guide
-
Rocket Boxer Timer User Manual
-
Baratza Encore ESP Setup Guide
-
Baratza Encore ESP User Manual
-
Fellow Opus User Manual
-
Fellow Opus Setup Guide
LUCCA A53 Mini / La Spaziale Mini Vivaldi: Fuse Housing Inspection and Replacement
Below are photo instructions for inspecting and replacing a fuse housing on a La Spaziale S1 Mini. If your machine isn't getting power, the fuse housing may be damaged. (Difficulty ☕☕)
If a new fuse housing is needed, the part is available on the website here: La Spaziale Fuse Housing
Tools Needed:
- #2 Phillips head screw driver
- #3 Phillips head screw driver
- 17mm crescent wrench
INSPECTION:
1. With the machine unplugged and cool to the touch, remove the lower front panel by unscrewing the indicated screws.
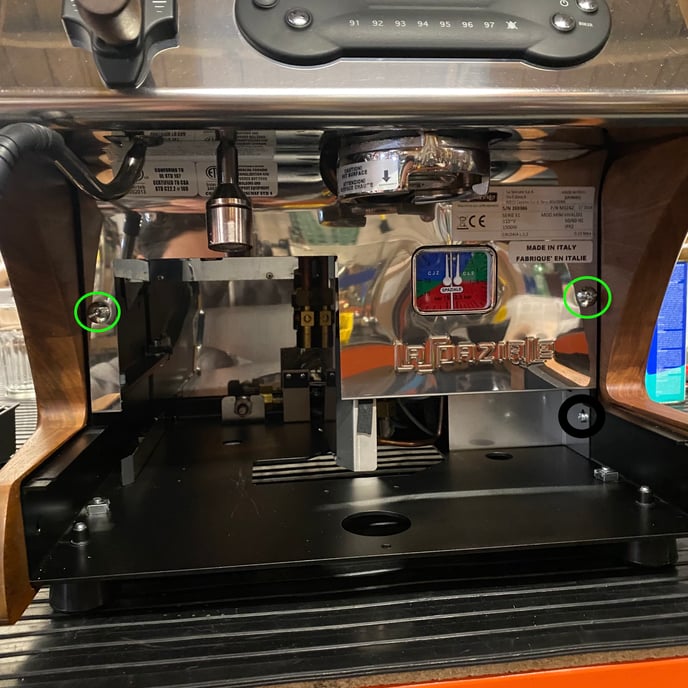
2. Remove the access plate from the lower right of the machine by unscrewing the single screw.
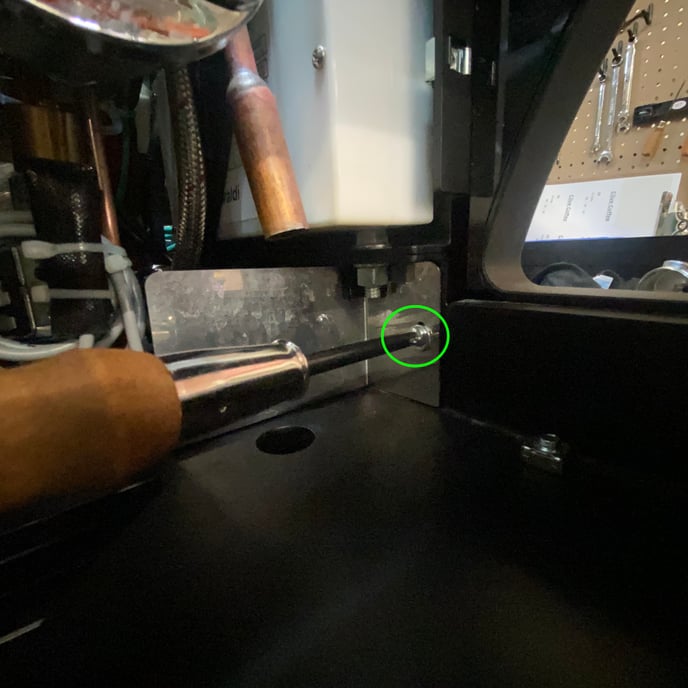
3. Look straight back into the front of the machine on the right-hand side, the fuse housing will be sticking through the bottom of the machine with two electrical leads connected. Look for any signs of damage to the housing or the electrical leads.
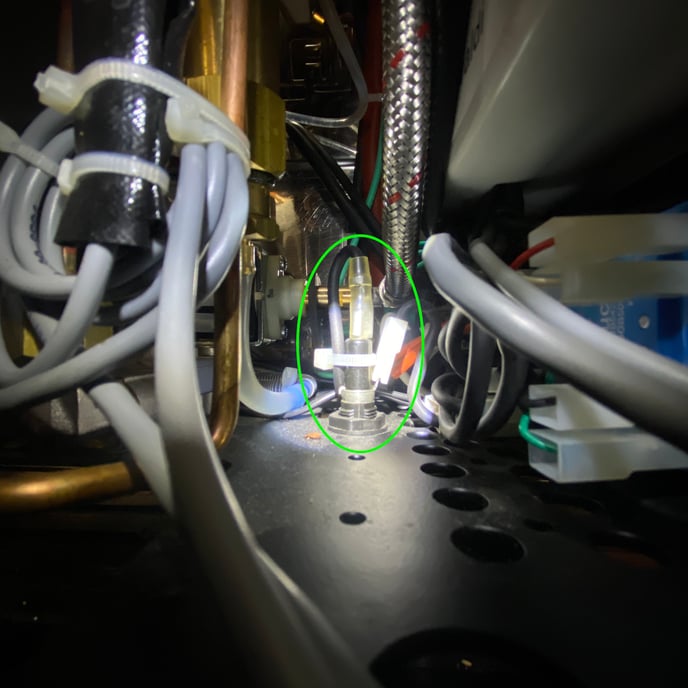
REPLACEMENT:
1. With the machine unplugged and the front panel off, proceed to remove the back panel.
2. Now that you have access to both sides of the fuse housing, unplug the two electrical connectors as indicated.

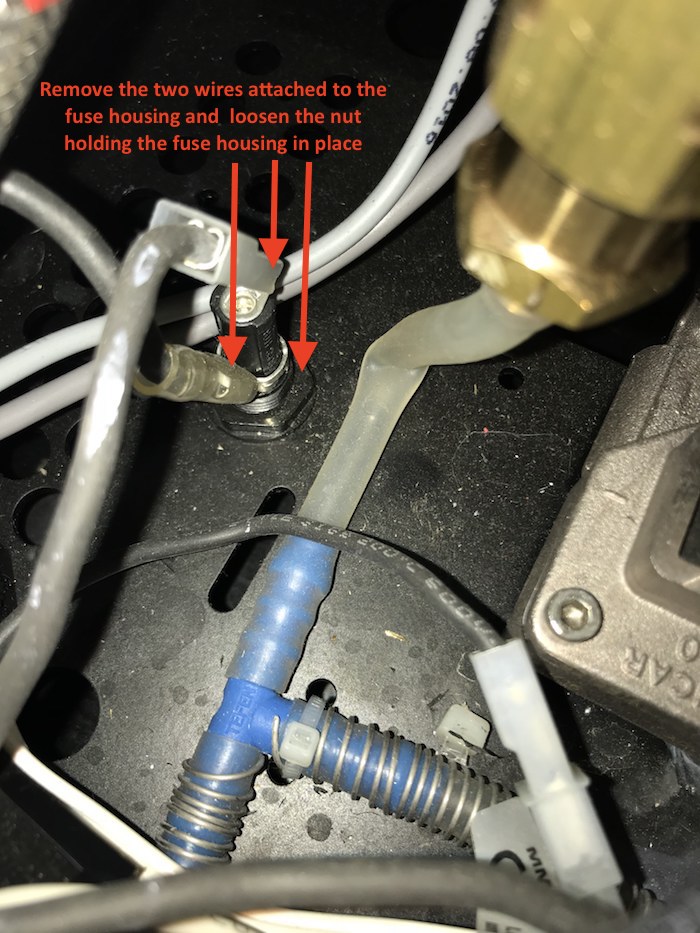
3. Use the 17mm crescent wrench to loosen the plastic retaining nut on the fuse housing. Hold the retaining nut in place with the wrench, then unscrew the fuse housing from the bottom of the machine by hand.
4. Once removed install the new fuse housing by following the above steps in reverse order.