Please read carefully before using your LUCCA M58 Espresso Machine.
If you have any other questions, be sure to contact us.
Setup Video
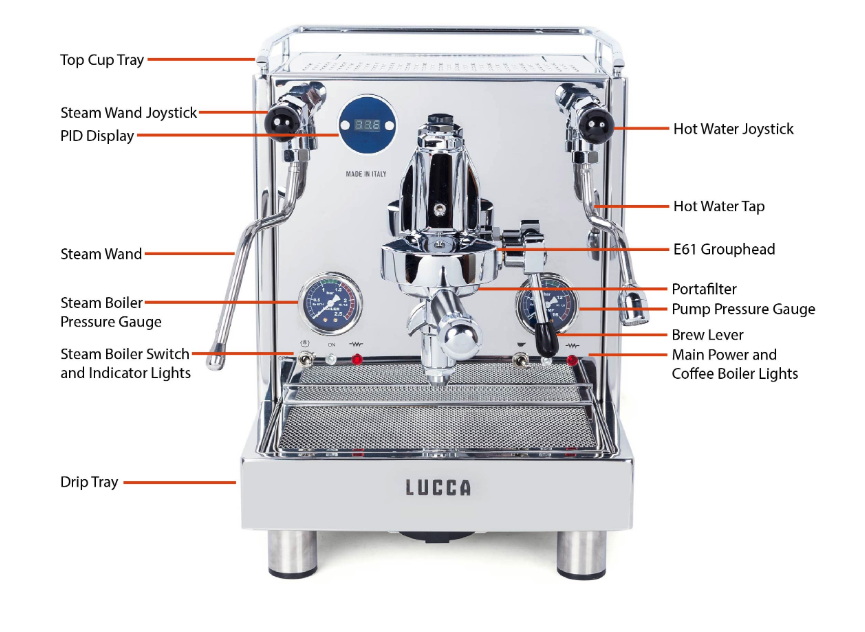
Machine Diagram
Included Accessories
- Double spouted commercial portafilter
- Bottomless commercial portafilter
- Double basket
- Triple basket
- Blind basket
- Cleaning brush
- Direct plumb kit
- 15 amp converter cord
Water
Espresso machines have specific water requirements. Two primary considerations are filtration and hardness.
Filtration removes tiny particles, such as sand or rust, from your water. If these particles were allowed to enter your machine, they could cause all manner of trouble, particularly by clogging the precise valves and mechanisms in your espresso machine. Almost any water filter will do the job, whether it’s the one built into your fridge, a Brita, or a whole-house filter. Ensuring that this filter is replaced at the proper time will be important to ensure machine health.
Water hardness is equally important. Ideally, we want a hardness of between 35-85 ppm (parts per million). Hardness refers to the dissolved solids in your water. Common dissolved solids are things like magnesium, calcium, and various forms of sodium. These dissolved solids are what make water, and therefore espresso, taste good. But too much will result in scale buildup in your machine. Scale can cause irreparable damage to your machine by clogging and forming a mineralized layer over the surface of metal parts. The process of descaling is even more damaging, eating away at the machine's metal internals. Luckily, scale can be entirely avoided by keeping your water hardness within the recommended TDS range of 35-85 ppm.
There are numerous methods to soften your water should its dissolved solid content be too high.
A note on RO (Reverse Osmosis) or Distilled Water
Taste aside, espresso machines require some mineral content to function properly. Their steam boiler fill probes, in particular, use water's conductivity to detect the water level. With no dissolved solids, they’ll overfill, giving you water instead of steam. You must add some mineral content back in. Our recommendation is Third Wave Water packets, which are designed to offer ideal flavor and to be safe for your machine.
Reservoir Solutions
Our first recommendation is an in-reservoir water softening pouch. They’re affordable, last 4-6 months, and are very effective. Another great option is to use RO water purchased by the gallon in combination with Third Wave Water packets.
Direct Plumb Solutions
For machines that are plumbed in, we recommend our Water Softening and Filtration kit. It includes everything you’ll need to ensure the water is safe for your machine and delivers the best taste for your espresso.
No matter what solution you pick, we recommend testing the water coming from your machine’s group head every few months. City water hardness changes seasonally, and softening systems wear out. Routine testing will ensure you keep your machine safe.
First-time setup with the reservoir
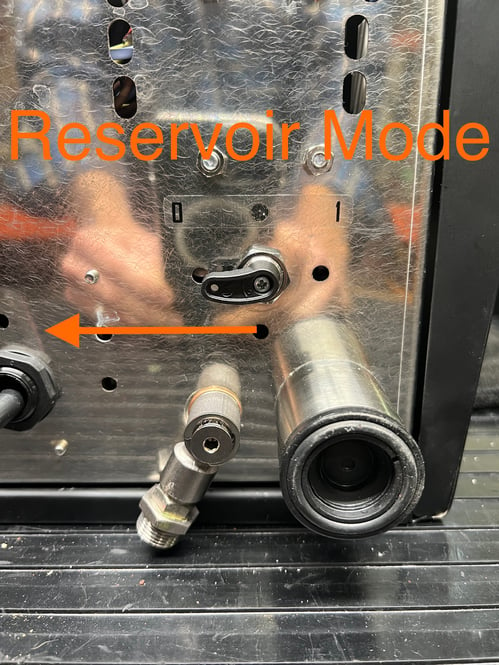
If you are using the machine with its internal reservoir, you will first need to set the water source ball valve and low water alarm toggles to the correct positions.
To use the internal water reservoir, the ball valve toggle should be pointing toward the middle of the machine, and the low water alarm switch should be turned on by setting the toggle to the "O" position as shown in the pictures below:
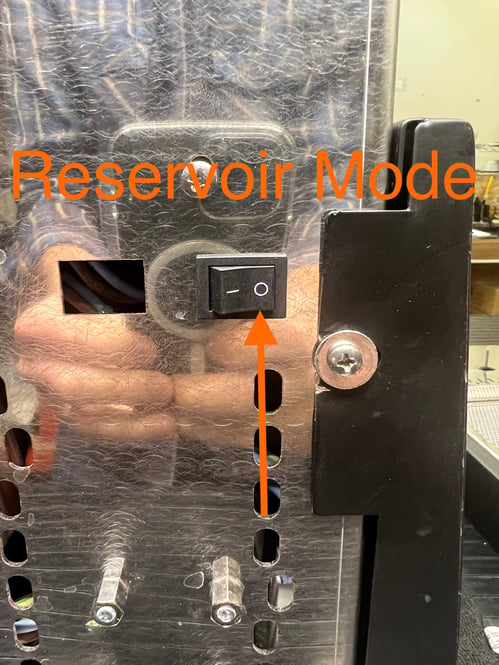
You may then simply fill the reservoir with your filtered and softened water, leaving a few inches at the top to prevent spillage. The reservoir is removable. Ensure that you do not spill water on top of the machine when filling, as this may cause electrical damage.
First time setup with the water line
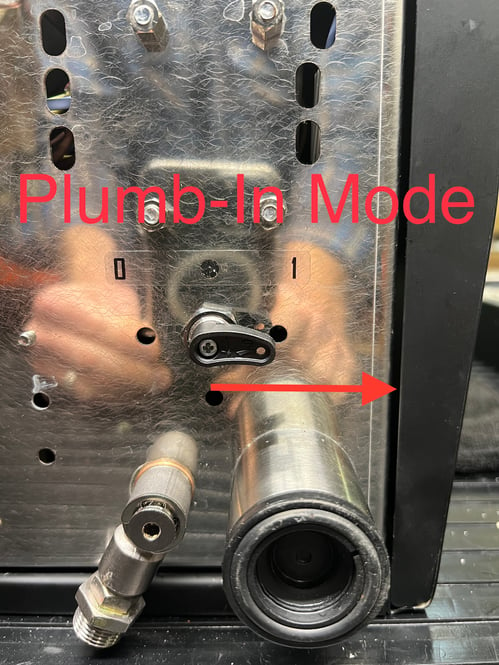
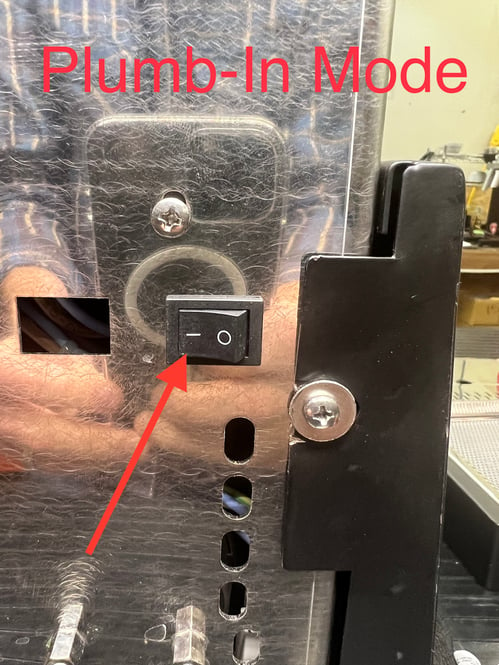
If you are setting up your M58 to be directly plumbed to a water source, you will first need to set the water source ball valve and low water alarm toggles to the correct positions.
To set your M58 to plumb-in mode, the ball valve toggle should be pointing toward the outside (right) of the machine, and the low water alarm switch should be turned off by setting the toggle to the " - " position as shown in the pictures below:
Your LUCCA M58 comes with a braided water line that connects to the water inlet on the bottom of the machine and has a 3/8ths OD push connect fitting on the other end to connect to a plastic water line directly. The updated braided lines feature compression fittings to make a watertight seal—fiber washers are no longer necessary or included with the Lucca M58. If you plan on plumbing in your own water kit to the braided line that doesn’t use a 3/8ths OD plastic tubing, you’ll need to find an adapter for the braided line as it has a 3/8ths BSPT threaded female connection. Standard pipe thread in North America is NPT thread.
These machines require 30-45 PSI of line pressure from the plumbed-in water supply to work properly. Too little or too much line pressure can cause premature wear and even damage. If you don't know the line pressure going into your machine, you must install a pressure regulator on the line between the water supply and the machine.
Programming PID and Settings
Note - The PID controller and heating lights will turn off when the reservoir is empty.
There are two programming modes: one while the machine is on, and one while the machine is off:
While the machine is on, press both power buttons at the same time to enter temperature adjustment of the coffee and steam boiler. Setting T1 is for the coffee boiler, and setting T2 is for the steam boiler. The left button will cycle from T1 - T2 and then back to standard machine operation. The right button will enter the settings value, display its current value, and allow you to change it. If you press the right button while on T1 “202” (coffee boiler temperature) will display for a couple of seconds. While the value is displayed the left button will drop the value 1 and the right button will raise the value 1.
While the machine is off, hold down the left and right PID buttons and turn on the machine. Hold down the buttons until F. 01 appears. From here the same rules apply for the standard operation programming mode, you can cycle through the menu with the left button and access the settings value with the right button. We highly recommend leaving these values alone as our technicians have set them upon bench testing.
Advanced PID Settings
Warning—This section allows the user to change the machine from Fahrenheit to Celsius mode and to make other advanced settings that can greatly affect its performance.
These settings have been calibrated using specialized test equipment and should not be changed unless the user has a thorough understanding of how a PID controller operates.

To get into the advanced programming mode, with the machine turned off, hold down both left/right buttons simultaneously and then turn the machine on. Keep holding the left/right buttons until the display reads F.01, and then release the buttons. Use the left button to cycle through parameters, and then the right button selects a parameter to change. Then use the left/right button to change the selected parameter.
To save the new change,s turn the machine off and then back on again.
F.02 Mode Setting - By default, the F.02 setting has been set to 4 (15 amp mode) to give priority to the coffee boiler. The setting can also be set to 6 (20 amp mode) to give power to both boilers.* This can be helpful if you are steaming larger quantities of milk and desire more steam capacity. If you change the F.02 setting to 6 to power both boilers, then both power switches must be on for the machine to operate, or neither boiler will heat up.
*Note: 20 amp mode is a setting only available on the V1 M58 models. The V2 M58 does not have 20 amp capability, so "6" will not appear in the F.02 settings list.
E1/E2 Offset Setting - The coffee boiler offset setting has been calibrated using a special Scace device and should not be changed. The steam boiler offset setting is set to 0° by default. It can be changed up to 5° to increase the steam pressure, but the pressure may vary at higher elevations, so make sure it does not exceed 2 bars of pressure or damage may occur.
Technical Details
For a complete list of technical details, please see the spec table on our product page.
Now you're ready to start pulling shots! Check out our Espresso 101 section to learn about steaming milk, latte art, our suggested starter espresso recipe, grinder dial-in tips, and much more.
Looking for Help with Flow Control?
Helpful Links
Still have questions? Reach out to our coffee experts and technicians.