Profitec T64: User Manual
Thank you for purchasing the Profitec T64 espresso grinder. In this user manual, you should find everything you to need to operate and maintain your machine.
Please read carefully before using your Profitec T64 espresso grinder. And if we've missed anything, you always know how to contact us. Let's get started!
Setup Video
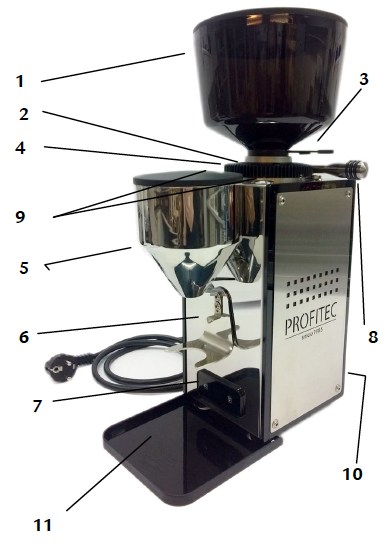
Grinder Diagram

!! NOTE: ALWAYS KEEP YOUR ORIGINAL PACKAGING IN CASE OR RETURN FOR SERVICE !!
Included with Delivery
- Grinder with bean hopper and lid
- Lid for the funnel
- Catching tray for grounds
- Safety screw fixture for bean hopper
- Instruction manual
TECHNICAL DATA
- Housing: Stainless Steel
- Grinding Mechanism: Aluminum
- Burrs: Stainless steel 64mm
- Capacity bean hopper: 1.2 lbs
- RPM: 1400
- Voltage: US115
- Frequency: US60
- Motor Output: 450W
- Grinding time: T-On: 10 sec / T-Off: 80sec
- Weight: 16.5 lbs
- Dimensions: 17"H x 6.7"W x 9.8"D
General Safety from Manufacturer
Make sure that the local main supply voltage corresponds to the information given on the type plate on the bottom of the coffee grinder.
- Always fasten the bean hopper with the safety screw.
- Carry out the installation of the grinder according to the instructions.
- Plug the grinder into a grounded socket only and do not leave it unattended.
- Do not roll or bend the power cord.
- Always remove the electrical plug from the outlet prior to conducting maintenance or cleaning work on the grinder.
- Do not use an extension cord/ do not use a multiple socket.
- Place the grinder on an even and stable surface.
- Never place the grinder on hot surfaces.
- Never immerse the grinder into water; do not operate the grinder with wet hands
- The grinder should only be used by experienced adult persons.
- The grinder is not intended for use by persons (including children) with reduced physical, sensory or mental capabilities, or lack of experience and knowledge, unless they have been given supervision or instruction concerning use of the appliance by a person responsible for their safety.
- Children should be supervised to ensure that they do not play with the appliance.
- Do not expose the grinder to inclement weather (frost, snow, rain) and do not use it outdoors.
- Keep the packing out of reach of children.
- Use original spare parts only.
- Do not exceed the max. allowable continuous grinding time: T-On: 10 sec / T-Off: 80 sec
Operating Your Grinder

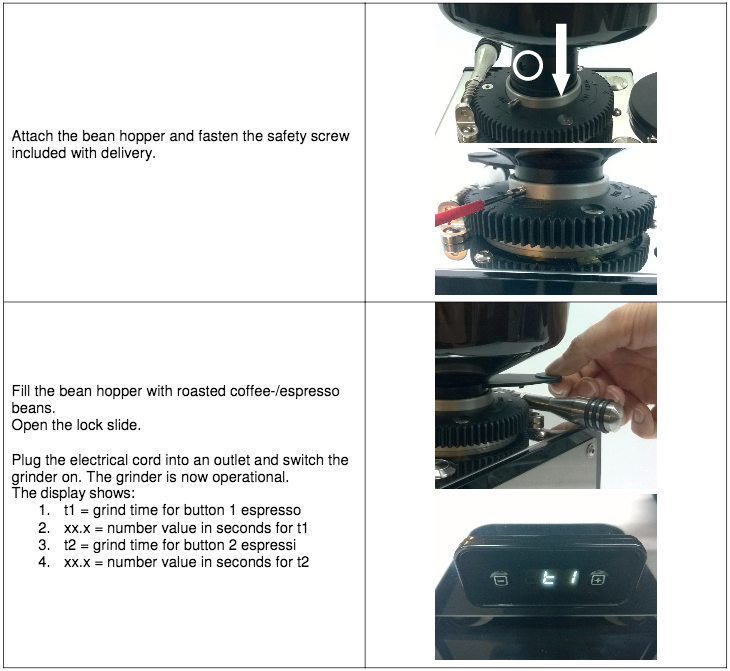
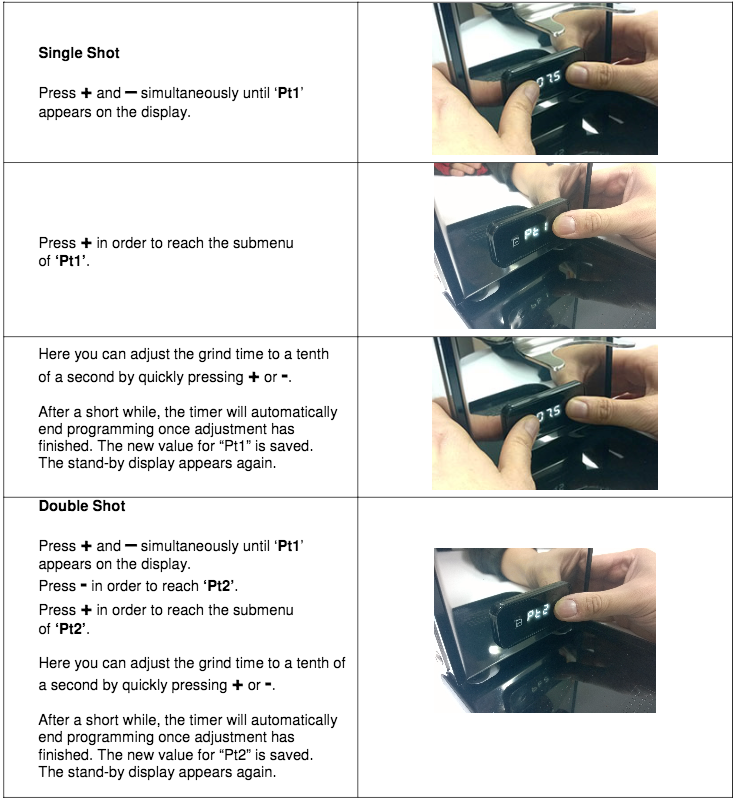
Programming the time on your grinder

Manual Grinding – Keep either grinding button depressed You can manually grind a varying amount of coffee. Keep pressing either one of the grinding buttons until the desired amount of coffee has been ground. “man” is displayed during manual grinding
Stopping the grinding process – Press one of the grinding buttons You can stop the grinding process by pressing either of the grinding buttons during timed grinding.
Cleaning your Grinder
Cleaning of the housing and the bean hopper - Occasionally clean the housing and the tray with a damp cloth. You should clean the bean hopper with a cloth prior to refilling the hopper in order to remove coffee oil residues. These residues can negatively effect the flavor.
Cleaning of the burrs - Please use Urnex Grindz cleaner as directed.
Tips and Troubleshooting
Should a bean become stuck in the grinding mechanism, you may easily fix this yourself.
- Adjust the grind to a coarser degree. Turn the grind adjuster counter-clockwise by two full turns.
- Press the grinding button and grind coffee. The stuck beans should now come loose.
- Re-adjust the grind.
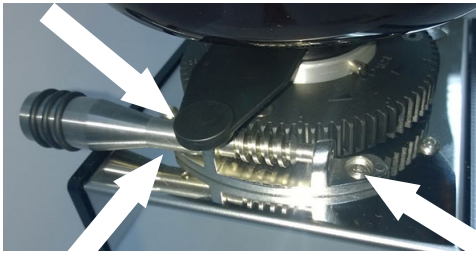
In case the grind setting of your grinder changes autonomously after many grinding procedures, it is most likely that vibrations during grinding have caused the bracket of the grind level adjuster to become loose. Please proceed as follows to correct the problem:
- Switch the grinder off and unplug the electrical cord.
- Loose the screw of the adjustment of the grinding level (1,5 mm Allen wrench).
- Loosen both screws that are, or were, holding the grind adjustment bracket (2.5mm Allen wrench).
- Position the bracket as close to the gear wheel as possible and tighten both screws again.
- Tighten the screw of the adjustment of the grinding level again.

Helpful Links
- Dialing In Your Grinder
- Espresso 101
- Clive Blog
- Grinder Cleaning & Maintenance
- Manufacturer Manual in PDF
Still have questions? Reach out to our coffee experts and technicians.